Posts

Showing posts with the label Christmas Cards

Glittery Snow Globe

Image
I have a collection of snow globes that I bring out every Christmas. A couple can stay out all winter long, but most have a Christmas theme. I have had a fascination for snow globes ever since I was a child and bought my first one on a trip to New York City. It was a plastic souvenir globe with the Statue of Liberty inside. So I was delighted when Stampin' Up! came out with this snow globe stamp set. There was another one a couple years ago, but it didn't compare to this one! I couldn't wait to make a card using the shaker domes. We made this card at my last stamp class. The insertion of the dome is much easier than you might think. In fact, it's super easy. The first thing I did was cut hole for the globe from the Shaded Spruce card stock, centering it. We laid that aside while working on the Christmas scene because I used the Crystal Effects with glitter (we now have Shimmery Crystal Effects for a single step) and it needed to dry. Of course, we colored the scen...
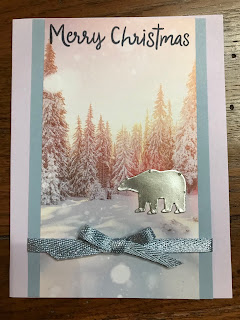
Super Simple Christmas Cards

Image
The Feels Like Frost dsp is so pretty, it can stand alone. And that's how I used it for these cards. Stamp the greeting, either directly on the paper or on a banner, add a cut-out and the design is complete. An easy way to churn them out. I used the bears from the Snow Globe Scenes on these cards, but the deer would work, too. Add some ribbon for a little extra pizzazz. Products Used: Snowman Season photopolymer stamps (12), 150458, $18.00 Feels Like Frost 6" x 6" Specialty Designer Series Paper (48), 150444, $14.50 Whisper White 8-1/2" x 11" card stock (40), 100730, $9.75 Purple Posy 8-1/2" x 11" card stock (24) 150881, $8.75 (upper card) Seaside Spray 8-1/2" x 11" card stock (24), 150883, $8.75 Silver 12" x 12" foil sheets (2), 132178, $5.00 Pretty Peacock 8-1/2" x 11" card stock (24), 150880, $8.75 (lower card) Seaside Spray Metallic Ribbon (10 yards), 150446, $7.00 Night of Navy Classic Stampin' Pad...

Christmas Beauty & Joy

Image
I find I like so many designer papers but just don't use them up as quickly as I should. Sometimes it's because I like them so much I decide to hoard them; other times, I just don't have enough left of one design to use for a class so they accumulate. But I am determined to use up as much of that old paper as possible before purchasing much more. For this card, I used some of the paper designed to accompany the Christmas Quilt stamp set. In order to use this in one of my stamp classes, the ladies received different designs and complementing colors. They were either Real Red with Garden Green or Garden Green with Real Red. That way, the stamp colors coordinated no matter which paper they used. I fear ribbons have accumulated the same way the designer series paper has, so I'm also trying to use that up. I pulled a pile of ribbons out for my customers to make their own selection. We all had fun playing with the basic design. The red rhinestones here are the basic rhi...

Yet Another Poinsettia Card

Image
Looking through my abundant supply of discontinued designer series paper, I designed a final card using the Peaceful Poinsettia bundle. I think I made and gave or sent over 100 cards this year, so I had quite a variety that went out. Several posts back, I shared super simple designs that helped me crank them out. They, too, used discontinued dsp. I had thought this particular dsp was rather busy and had struggled to use it even though I used most of the rest of that pack. However, it was perfect for this card. After adhering the holly leaves with berries to the card, I colored them in with my Stampin' Blends, although I could have used the coordinating markers. I guess I've just gotten into the habit o fusing my Blends even before picking up my markers! I used the open die on the dsp and then cut the detailed flower from Basic Black cardstock using both the open and the detailed thinlits together. Even the holly and berries were cut from Basic Black. I've been using a l...

Still More Peaceful Poinsettia Bundle

Image
My class in early December featured the Peaceful Poinsettia bundle, in case you hadn't figured that out by all the posts using this set. I am so glad I purchased this set! I saw something similar to this card on-line (stampingsmiles.com) and loved it. I did not yet have the Delicate Lace Edgelits that she used, but they have since arrived and I will be showcasing them in the very near future!  So I used the curved Framelit from the "In the Woods" set. My leaves are different and I added the Gold Metallic Thread. After cutting out the holly leaves, I trimmed them down to exclude the berries.  All these delicate cuts were made with adhesive sheets on the back of my cardstock. If you look closely, you will see that my flower is raised up with Stampin' Dimensionals. Products Used: Peaceful Poinsettia rubber stamp set (7), W 147784, $29.00; C 147781, $21.00 Detailed Poinsettia Thinlits Dies (8), 147925, $33.00      Bundle, stamps & dies: W 149964, $...

More Peaceful Poinsettia Bundle

Image
Once I started using this stamp set, the ideas just kept coming, although I admit that I had been looking at samples on-line and I have no idea where parts of this design came from. I have a tendency to think that my images need to stay inside the shapes, like the ovals used here. However, this design element extended past the edges and it actually adds to the texture. Of course, the Stampin' Dimensionals behind it help. I knew as soon as this annual catalog came out that I would love the Tufted 3D Dynamic Textured Impressions Embossing Folder. Its use on the Cherry Cobbler background adds a depth and richness to the overall effect of the card. Although you can't see it looking at this picture, I used Wink of Stella on the white holly berries. Because of the layout, I needed smaller words than came with this set, so I used my other favorite stamp set, His Light. The red and greens in this card are Cherry Cobbler and Old Olive. As I write this, all my cards have been maile...

Peaceful Poinsettia Bundle

Image
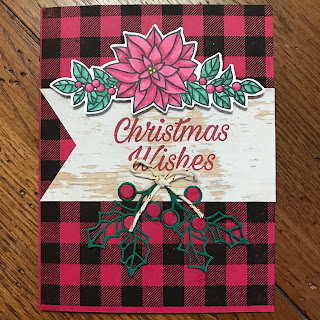
This bundle is just too much fun! For this card I mixed my favorite Lovely Lipstick with Shaded Spruce and Early Espresso, although everyone thinks my checks are stamped in Basic Black. I had fun figuring out how to make a card using the cut-out, stamped poinsettia. I love the result. Thankfully I used the Stamparatus for the Buffalo Check background. With the grid sheet to protect its base from ink, I was able to line up the background stamp on the open card so it would not extend past the score line. Then, when I didn't get an even transfer of ink, I could just do it again with perfect alignment. Products Used: Peaceful Poinsettia rubber stamp set (7), W 147784, $29.00; C 147781, $21.00 Detailed Poinsettia Thinlits Dies (8), 147925, $33.00      Bundle (stamps & dies): W 149964, $55.75; C 149962, $48.50 Buffalo Check rubber background stamp, W 147797, $20.00; C 147794, $15.00 Lovely Lipstick 8-1/2" x 11" cardstock (24), 146970, $8.50 Whisper White 8-...

Peaceful Poinsettia stampset and Detailed Pointsettia Thinlits Bundle

Image
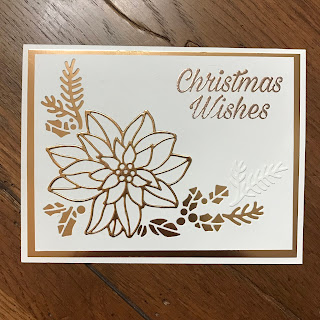
I love the poinsettia yet found myself reluctant to order the poinsettia bundle in the Holiday Catalog  because I have so many Christmas sets that have been discontinued. I finally gave in and have had so much fun creating with it! Because of the shape and size of the corner thinlit, there aren't too many options for card fronts when using the corner piece. The variety, I think, comes from what you place behind it. Below are two variations of the same format. The first card is done in Whisper White with Copper foil behind the cut-outs and Copper Stampin' Emboss powder for the greeting. Unwilling to waste the boughs cut from the Whisper White card stock, I simply added them on the card front for added texture. The thinlits include an open frame for the poinsettia as well as an intricate thinlit.  In order to achieve the large poinsettia, you need to use both. The intricate piece fits nicely inside the open framelit so you can run them both through the Big Shot at t...

In the Woods Paired with His Light

Image
I have had so much fun with these two sets.  I love having words that express what I would like to say because of my deep faith. "His Light" stamp set is perfect for that. Then there's the Winter Woods stamp set with its coordinating framelits dies. So much versatility! All you need is your own creativity. For this card we made a wreath. I actually had my class members lightly trace a circle in pencil to make it easier to create a round wreath.  We then stamped the evergreen bough around the circle and then on scrap paper. I love the fact that Stampin' Up! included three framelits for this bough, making it so much quicker to cut multiples.  Products Used: Winter Woods rubber stamp set (7); W 147658, $31.00; C 147661, $23.00 In the Woods Framelits Dies (11), 147919, $33.00      Bundled: W 149991, $57.50; C 149992, $50.25 Cherry Cobbler 8-1/2" x 11" card stock (24), 119685, $8.50 Very Vanilla 8-1/2" x 11" card stock (40), 101650, $9.75 ...

Rejoice!

Image
Simple elegance is how I would describe this card we made at my October stamp class. Easy to put together yet the use of gold made it sparkle. I fear the color didn't come through as well as I would have like it.  Believe it or not, the card and the background for the gold embossed words is Crumb Cake, even though it looks like gray.  I embossed the Berry Burst card stock using the Tin Tile Dybnamic Textured Impressions Embossing Folder and then smeared Gold Shimmer Paint all over the surface using a sponge dauber, although it barely shows on this picture. The rest is self-explanatory. If you saw yesterday's post, you also saw a variation of this card. Before assembling this card, the gold foil leaves were cut from the piece that backed our greeting. Saves paper, which also saves money. And no one would ever know unless they take the card apart. I have a group of ladies from church who come to my house once a month to make birthday cards for church family. But this month, ...

Assembly Line Stamping

Image
I think this has been the busiest holiday season I have ever experienced; hence the limited number of posts. So while Christmas goodies are baking in the oven, I decided I would take the time to share some of my Christmas cards. I made and sent or gave over 100 cards this year. Hence the need to find some super easy designs I could just whip out. I found the Stamparatus extremely helpful with these cards. I was also using up old designer series paper, so you may or may not recognize it. I made a template by cutting a rectangle from card stock the size of the Whisper White card stock and then set up the Stamparatus with the card stock. This enabled me to be sure my piece to be stamped was not too close to the edges but would be placed exactly where I wanted it. I then added the "Rejoice" and "Christ is born" stamps, inked them up and started stamping. No mistakes, no smudges. For the other card, I was using a retired stamp set as well as colors (Baked Brown Sug...

More Winter Woods Bundle

Image
Shaded Spruce is the perfect green for creations using the Winter Woods stamp set. I used Shimmery White card stock along with some Sparkle Glimmer Paper. Perfect for a snowy scene! The curves for the layers of snow are included in the Framelits Dies that go with this stamp set. I'm actually thinking of adding some Shimmery White Embossing Paste to some of the branches on my evergreen tree. Products Used: Winter Woods rubber stamp set (7), W 147658, $31.00; C 147661, $23.00 In the Woods Framelits Dies (11), 147919, $33.00           Bundle: W 149991, $57.50; C 149992, $50.25 Whisper White 8-1/2" x 11" Thick Cardstock (24), 140272, $7.75 (card base) Shimmery White 8-1/2" x 11" Cardstock (10), 101910, $9.00 Sparkle Glimmer 12" x 12" Paper (2), 146957, $5.00 Shaded Spruce Classic Stampin' Pad, 147088, $7.50

Night In Bethlehem Bundle

Image
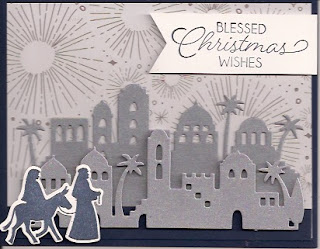
I'm always on the hunt for Christmas cards that reflect the real meaning of Christmas and the Night in Bethlehem stamp set and edgelits bundle fits the bill perfectly! This card incorporates stamping, edgelits, designer series paper, and dimensionals. The buildings are cut from our old brushed silver card stock, which I wish had never been discontinued. I guess the foils are preferable today, but for these buildings I wanted something more sturdy. The background is from that incredible "Year of Cheer" Specialty Designer Series Paper. All the silver and gold used on these sheets make them real stand-outs. I chose this piece because it made me think of stars exploding in splendor and seemed the perfect backdrop for the city of Bethlehem. Looking at it now, I almost wish I had chosen the shepherd with his lamb in the foreground because the Baby Jesus would have been born already, giving the stars reason to "explode". Products Used: Night in Bethlehem rubber ...

Christmas Tree

Image
As I was preparing for the holiday bazaar, I was also trying to use up all those little pieces of card stock and dsp laying around my stamp room, some from kits I had cut for previous classes. This card was made from one of those kits and uses retired products. I loved this embossing folder from a couple years ago. Looking closely at it, I decided a Christmas tree would fit perfectly and used the tree from the Foxy Friends stamp set. I also have the retired Perfect Pines Framelits which fit the trees in the Foxy Friends stamp set. But when I stacked the pieces together, I realized the card needed something else to make it special. The Gold Metallic Thread was the perfect answer. I merely added a strip of Fast fuse in the center of the oval embossing and pressed my gold thread on that. Then I put a strip of dimensionals taken from the edges over the fast fuse and added the tree. The gold star was punched from our Gold Glimmer paper with a retired mini star punch. Amazing how much someth...

Window Christmas Quilt Card

Image
The idea for this card came from a Stampin' Success magazine demonstrators receive, although I tweaked it a little. I found that a large Post-It note was a big help in lining things up just the way I wanted them. I also discovered that the stamps used have to line up just right, so be sure you turn the stamp according to the way the square was cut from the front of the card. The first step on this card was to place the framelit on the 4-1/4" x 11" card base just below the score line (5-1/2"). There is a Whisper White liner inside the card (4" x 5'1/4"). I used the layering square framelits for cutting my Whisper White and Real Red card stocks for inside the card. When I finished stamping and adhering the unit, I lined them up beneath the "window" and firmly pressed a Post-It note across the window and stamped piece. Leaving it attached, I ran snail across the back of the Real Red scalloped square and then closed the card, pressing firmly....

Quilted Christmas Card

Image
I tried to design a fairly easy card for my stamp class using the Quilt Builder Framelits Dies that coordinate with the Christmas Quilt stamp set. Using a 3" wide piece of Quilted Christmas 6" x 6" Designer Series Paper in the middle of my card enabled me to turn the quilt square on its point and have the gingham show through. Because the gingham design occurs in both Real Red and Garden Green in the paper stack, some attendees made red with green cards while others made green with red, as seen in my sample below. I precut the quilt square and saved the small pieces that we then added to the quilt to make the "star" stand out.  When everything was attached to the card front, we ran it through the Big Shot using the Quilt Top Textured Impressions Embossing Folder. Everyone was amazed what a difference that finishing touch made. Unless your Big Shot is loose, you need to be careful not to fold the card around the folder; line up the score line with the edge of th...

Night in Bethlehem

Image
I have seen so many impressive cards made with this set and its accompanying dies, but this is the one I designed for my October stamp class. One thing you should know: the village of Bethlehem stamp does not fit the Edgelits Dies. Looking at the catalog now, I think I could actually have stamped the village above and behind the die-cuts. The first step in making this card was to sponge some Soft Sky and Crumb Cake inks on the front of my Whisper White card. Next we stamped the greeting in Night of Navy ink. While we were at it, we used the same ink to stamp Mary and Joseph on a scrap piece of card stock so we could cut them out with a framelit. The stars were then stamped with Smoky Slate ink. Since I pre-cut the Bethlehem Edgelits, all we had to do was attach them. I glued down the taller of the two "villages", and mounted the smaller one slightly below the first using Stampin' Dimensionals (the minis were a real help on some of the smaller parts). I glued the heads...

More Christmas Elegance

Image
Another simple but elegant card. As you can tell, I just love the metallic foil snowflakes. For this card, I chose to use silver and Night of Navy (the package of Foil Snowflakes includes 12 of silver and 12 of gold). The silver snowflakes stamped on the Night of Navy card stock are actually stars from The Night in Bethlehem stamp set, but I think they easily pass for snowflakes. I cut the silver foil snowflake in half to place against the 2" x 5-1/4" strip of Year of Cheer Specialty Designer Series Paper on the 4" x 5-1/4" Night of Navy card stock. A piece of 1/8" silver ribbon covers the "seam" and adds the extra special touch the card needed. I chose to use "peace" from the Christmas Quilt stamp set because a snowy day always seems so quiet and peaceful to me. Products Used: Night in Bethlehem rubber stamp set (8), 144809, $29.00; C 145282 $21.00 Christmas Quilt photopolymer stamp set (16), 144793, $21.00 Whisper White 8-1/2...

Easy Christmas Elegance

Image
Want a super easy but elegant Christmas card? This one fits the bill perfectly. All you need to do is adhere a 2" x 5" strip of Year of Cheer Specialty Designer Series Paper on a 3-3/4" x 5" piece of Whisper White card stock after stamping y our greeting in Night of Navy ink. Mount that on 4" x 5-1/4" Night of Navy card stock and adhere to a Whisper White card front. Add a gold Foil Snowflake and a large rhinestone and your card is finished—except for your inside greeting. Products Used: Musical Season rubber stamp set (7), W 144814, $25.00; C 144811, $18.00 Whisper White 8-1/2" x 11" card stock (40), 100730, $9.00 Night of Navy 8-1/2" x 11" card stock (24), 100867, $8.00 Night of Navy Classic Stampin' Pad, 126970, $6.50 Year of Cheer 12" x 12" Specialty Designer Series Paper (12), 144640, $13.00 Foil Snowflakes (24), 144748, $4.00

Christmas Shaker Card

Image
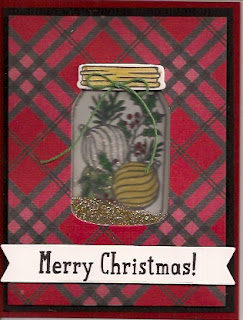
I had more fun designing cards using the Jar of Cheer stamp set and still didn't use all the stamps in the set. That means there are plenty of other ideas to pursue! Anyway, I've been wanting to try a shaker card for some time. Now that we have the flexible Foam Adhesive Strips, it is so much easier to make a card in any shape. So for this card, naturally, I made them fit the shape of a jar. For this card, I cut the jar (Everyday Jars Framelits) from  a 3-3/4" x 5" piece of designer series paper from the Warmth & Cheer paper stack, attaching a piece of a Window Sheet behind the opening. Then I stamped the jar and ornaments on a piece of Whisper White card stock using Basic Black Archival ink. The white needs to be large enough to extend past the opening in the dsp. I then colored with Stampin' Write Markers, using Garden Green and Cherry Cobbler for the leaves and berries and Wild Wasabi for one ornament. The other two ornaments were colored using clear an...