Posts

Showing posts with the label General Cards

Simple Snow Globe

Image
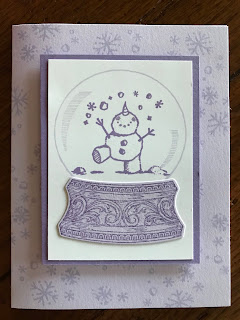
I have a couple customers who do not have a Big Shot or other die cutting machine who were thrilled to make a card that didn't require dies. We did use one die for the base, but that element could easily be fussy cut. This is such a fun card that could be used for a winter birthday or just a wintry note card. The card front is stamped all over using Purple Posy ink on Purple Posy card stock. Other than the "glass" globe, the rest of the stamping is done with  Highland Heather. I painted some Wink of Stella on the snowman to make him sparkle. Products Used: Still Scenes rubber cling stamps (6), 150503, $22.00 Snow Globe Scenes Dies (10), 150655, $31.00           Bundle (stamps and dies), 153023, $47.50 Purple Posy 8-1/2" x 11" card stock (24), 150881, $8.75 Highland Heather 8-1/2" x 11" card stock (24), 146986, $8.75 Whisper White 8-1/2" x 11" card stock (40), 100730, $9.75 Purple Posy Classic Stampin' Pad, 150084, $7.50 Hig...

Good Morning Magnolia Stamp Set

Image
I can't believe I have neglected this blog for so long. Now I have so many cards to post that I am not sure I will ever get to share them all. I have to admit that I have fallen in love with so many of the stamp sets in the annual catalog and then came the holiday catalog. There is no reason why I should order so many sets and yet I just can't resist them! The Magnolia Lane Suite was one of the first that popped out at me when the new catalog came out, but it took a while before I ordered it. So here is one of the first cards I made with this set: I love the regal look of this card! Merry Merlot is a color I wasn't sure I would ever use, but once I began using it, I find myself using it more than I ever thought I would. The flower is heat embossed in gold while the Merry Merlot piece behind it is dry embossed with the Magnolia 3D embossing folder. Some gold foil added to the elegance.  I have learned that I can save paper if I cut pieces from one layer before inco...

Beautiful Friendship Stamp Set

Image
One of my Facebook friends posted a picture of her roses, the color of which looked like our Mango Melody ink. So that became color inspiration for these two cards, the first of which we made at my June stamp class. It always works out that way: when I'm designing I usually make one I'm not thrilled with before creating the one I really like and want to share with others. And I didn't even use the Big Shot for these cards. Amazing! Because photopolymer stamps don't hold the color of markers that well, I inked the buds with Mango Melody and then went over the stems with the Call Me Clover Stampin' Write Marker. It changed the color somewhat, but still looks great. The card above grew on me, but I still like the first card better. I think it's the strip in the center of this one that isn't quite right, although I love the font used. I fear I had over-inked my Early Espresso ink pad, which caused a little smudge on the salutation. Solution: dab off som...

Crafting Forever

Image
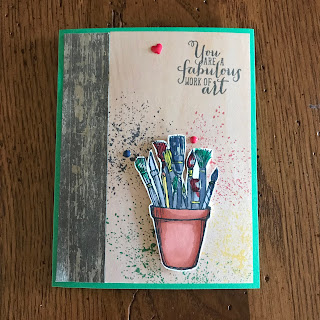
I discovered that one of my grandsons is interested in learning to sketch and even paint. A college student majoring in marketing, he has many interests. He plays violin and guitar and taught himself the keyboard. Definitely a creative young man. So I bought the Crafting Forever stamp set to make his birthday card, which I never photographed. This card is a variation of that one. I used watercolor paper for his card, but I didn't have enough left for my class to make the same one. So I altered it but used some of the same ideas. The Wood Textures designer series paper runs its course and I still have quite a bit to use up. I decided it would make a great background for this card, but still needed enough pieces for all my class attendees. That means some careful cutting and sometimes means not everyone will have the exact same piece. The words on this card are from the previously discontinued Work of Art stamp set and the paint splatters are from the retiring Touches of Texture ...

Fussy Cutting and Country Home Stamp Set

Image
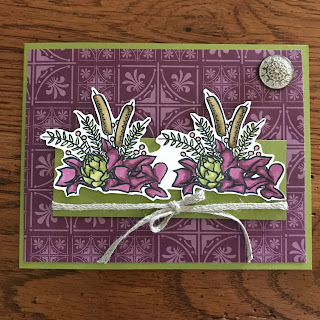
I have had so much fun creating cards with the Country Home stamp set and coordinating products. I actually made a set of cards to add to my daughter's birthday gift. When creating this card, I was looking for ideas to do something a little different from most of the cards made with this set, which meant a little fussy cutting. But before I did that, I decided I would use this piece of dsp from the pack of Country Lane Designer Series Paper.  When I design a card, I begin by laying elements out before adhering them until I'm satisfied with the design. I had a few of these vintage brads laying around, so I added one in the upper corner before adhering the Blackberry Bliss piece. I love this pattern! The problem is that I'm also very fond of the reverse side. I stamped the one arrangement twice and colored them with my Stampin' Blends. Then I adhered the bottom portion to a piece of Old Olive card stock, tied it with the new Braided Linen Trim and mounted the unit w...

Country Home

Image
I just love the Country Home suite! I've created a number of cards with this stamp set and its coordinating designer paper. The one I'm sharing here is very easy and uses the popular cotton stalks.  I actually used my light Smokey Slate Stampin' Blend on the bases of the cotton bolls and pulled the color outward with my color lifter. Added a little texture and made them stand out a little more on the Whisper White background. I made this card twice, once using the rustic pitcher and the second time using the milk can. The ribbon is discontinued but adds that special extra touch. Products Used: Country Home photopolymer stamp set (14), 147678, $21.00 Whisper White 8-1/2" x 11" card stock (40), 100730, $9.75 Mint Macaron 8-1/2" x 11" card stock (24), 138337, $.50 Country Lane 12" x 12" Designer Series Paper (12), 147804, $11.00 Memento Tuxedo Black ink pad, 132708, $6.00 Mint Macaron Stampin' Blends Combo Pack (2), 147283, $9.0...

One Card Three Ways

Image
When designing cards for my August stamp class, I was anxious to play with my new embossing folder. I also wanted to show the different effects of colors for the same card. In the process, I also changed the layout somewhat of one of the cards. Here are the three cards: This is the card we actually made at class: The lighter cards are made with Very Vanilla, Powder Pink, Soft Sea Foam and Granny Apple Green, while the darker one uses Crumb Cake, Berry Burst and Call Me Clover. And the rose and leaves in this Distinktive set are so realistic and dimensional just in the way they turn out when inked. And I have to admit that we did have to fussy cut the flower and leaves, but I enjoy the process of fussy cutting even though some of my customers do not. Products Used: Healing Hugs rubber stamp set (9), W 146527, $29.00; C 146530, $21.00 Crumb Cake 8-1/2" x 11" card stock (24), 120953, $8.50 Berry Burst 8-1/2" x 11" card stock (24), 144243, $8.50 Ver...

Simply Elegant

Image
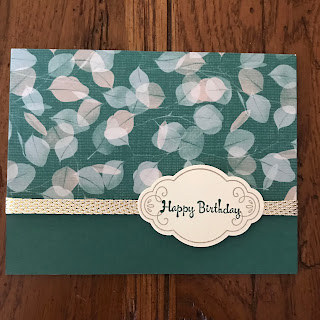
All you need is some gorgeous designer series paper, some ribbon and a greeting to punch or cut for a simple yet extremely elegant card. The vanilla and gold ribbon on this card is retired (I believe it was a two-pack from Sale-a-Bration), but any there are several ribbons you could use in our current catalog, including Burlap Ribbon, Gold Metallic-Edge Ribbon, Crumb Cake Classic Weave Ribbon, and even one of the ribbons from the Tea Room Ribbon Combo Pack. Products Used: Label Me Pretty rubber stamp set (6), W 143858, $23.00; C 143861, $17.00 You're Inspiring rubber stamp set (8), W 145805, $27.00; 145808, $19.00 Tranquil Tide 8-1/2" x 11" card stock (24), 144246, $8.50 Very Vanilla 8-1/2" x 11" card stock (40), 101650, $9.75 Nature's Poem 12" x 12" Designer Series Paper (12), 146338, $11.00 Crumb Cake Classic Stampin' Pad, 147116, $7.50 Tranquil Tide Classic Stampin' Pad, 147146, $7.50 Pretty Label Punch, 143715, $18.00

Painted Harvest Hedgehog

Image
I have seen this little guy on pinterest in so many settings and I just had to try it. We made this card at my June class and the attendees just raved about it. The scene is created with sponging and stamping. I think it looks like the hedgehog is peeking through the ferns. The designer paper and the wooden leaf are no longer in our catalog, but Stampin' Up! always has great things you can substitute. I began this scene by masking the bottom inch (about) with a Post-it note. Then I stamped the flower from Painted Harvest stamp set using Crumb Cake and Soft Suede inks. After removing the mask, I sponged on the Old Olive and then began adding the "ferns".  The face is from the Foxy Friends stamp set. The sky was created by sponging on some Balmy Blue ink. My original plan had been to wrap the dsp with the burlap ribbon, but I forgot to do so. Another creative opportunity, and I think I like this better than if I had wrapped it. Products Used: Painted Harvest photo...

Pretty in Powder Pink

Image
Items from the Share What You Love Suite certainly don't need to be limited to the products contained in the suite. Here I have used the Lovely Floral embossing folder with retired designer paper and embellishment. Just love the soft look and I think that paper coordinates beautifully with the flower in the folder. Once again I added some Whisper White craft ink to the raised portion of the embossed flower, which I embossed on the top portion of the card. I had those adorable felt bows left over, along with some powder pink ribbon, and just had to add one to the front.  No greeting as yet, so this can either be a note card or I can add a greeting later. Products Used: Lovely Floral Dynamic Textured Impressions Embossing Folder, 148048, $9.00 Powder Pink 8-1/2" x 11" card stock (24), 144244, $8.50 Craft Stampin' Pad (uninked) & Refill, 147277, $9.50 Fresh Florals Designer Series Paper Stack, retired (2017-18 Annual Catalog) 2017-2019 In Color Bitty Bows...

More Share What You Love

Image
I just went to town with the Share What You Love Suite from Stampin' Up!  So many ideas. Such gorgeous designer paper. For this card, I actually cut out a flower to attach to the focal point, but didn't use the whole flower. Instead, I lined it up with one that matched sufficiently because I was cutting from a scrap of paper instead of cutting into a bigger piece. But I think it turned out great. The Share What You Love dsp is worth the extra price you pay for it because you get twice as many sheets as the normal packs, the paper is the weight of card stock, it is hand-painted and it has a translucent, pearlized finish.  This card was actually one of the samples I made for my May class, not one we made. I used some old Mossy Meadow ribbon I had left from its In Color days and a piece of Mossy Meadow behind the dsp.  Did you know that you can cut your shape, in this case the scalloped circle from the layering circle dies, from the middle of you paper layer? No one will...

Using Both Sides Again

Image
I CASEd this card after seeing a video on how to use both sides of the Designer Series Paper, especially that of "Share What You Love" specialty dsp.  You won't see the reverse until you open the card. So I cut my card base at 5-1/4" x 5-1/2". Scoring at 4-1/4" gave me the standard size card. I then added a strip of Basic Black under the inch-wide portion of the card base before attaching a 4" x 5-1/2" piece of designer paper. When the card is opened, you see the reverse design. And remember, this particular paper has an extra special touch—a translucent, pearlized finish. Because I wanted to send an appreciation card to my "shepherd" at Community Bible Study, I added the letter I ("Make a Difference" stamp set) to the saying from the "Love What You Do" stamp set. The flowers on this card are also from the "Make a Difference" set. I was surprised when I discovered the "Stitched Shapes" framelit...

Using Both Sides of Your DSP

Image
I think this sheet of designer series paper from the Share What You Love specialty pack is my favorite. But then I look at another piece and I change my mind. They are all gorgeous. Both sides! There's usually at least one side that I'm not as fond of as the others, but in this case I would be hard pressed to pick a side I don't care for. What you can't see in this picture is the shiny, pearlized finish. The doily is also pearlized.  And this designer series paper is as heavy as card stock! I've paired this with the returning Mint Macaron card stock for the card base and the greeting. I'm still using the Stitched Shapes Framelits that were, to my dismay, discontinued. But you can use a circle punch or one of the Layering Circles Framelits. They have been so popular, I'm surprised they are no longer available. One of the nice things about this particular sheet is how both sides look good together. Consequently, when I cut my dsp 4" x 5-1/4" for ...

Flying Home Stamp Set

Image
I enjoy birds almost as much as I love butterflies. Birds seem to love our pussy willow tree out front and we have a bird feeder next to it where we can watch the birds. Granted, I wish I could find a food that the big black birds would leave alone, but I love watching the cardinals, the sparrows, the finches and the occasional blue jay. I need to get my hummingbird feeder hung now that it's finally warming up. So when the Flying Home stamp set appeared in the Occasions Catalog, it was one of my first purchases. As I was designing cards with retiring stamp sets and colors, I decided I wanted to make a card that did not need to be colored, even though I do enjoy coloring. I just wanted something different from what I usually see on-line and from what I've done before. So gold embossing seemed like the perfect solution.  Plus I could use the retiring ribbon and doilies. And those Sweet & Sassy Framelits that I had just bought are being discontinued, so I had to incorporate ...

Flower Shop Stamp Set

Image
Rose Red and Always Artichoke are two colors I am really going to miss. I've used them both for this card, along with Pink Pirouette and Soft sky. I really like having punches to coordinate with our stamps. They are so much more portable than the Big Shot and dies.  Both tools facilitate adding layers and dimension to your cards. The base of this card is Soft Sky, as is the embossed layer which is popped up with Stampin' Dimensionals. The flowers are also popped up with dimensionals. I used quite a mix of items when I designed this card. Products Used: Flower Shop rubber stamp set (6), W 130939, $24.00; C 130942, $18.00 Thoughts & Prayers rubber stamp set (8), W 128751, $26.00; C 127805, $19.00 Whisper White 8-1/2" x 11" card stock (40), 100730, $9.00 Soft Sky 8-1/2" x 11" card stock (24), 131203, $8.00 Pink Pirouette 8-1/2" x 11" card stock (24), 111351, $8.00 Always Artichoke 8-1/2" x 11" card stock (24), 105119, $8.00...

Watercolor Wings Stamp Set and Framelit

Image
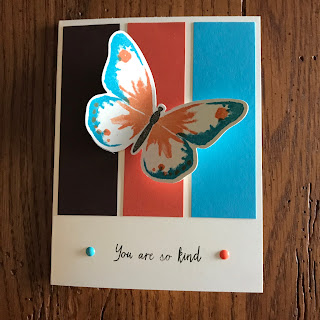
Oh, the creativity that flowed because of retiring colors and stamp sets! Colors I never thought of putting together have proved to be perfect together. In all honesty, I never cared that much for the Tempting Turquoise or the Tangerine Tango and never ever thought of putting them together. Actually, what inspired the combination was not just the fact that they are being discontinued, but also a shawl pattern I saw in similar but more subdued colors. Chocolate Chip is replacing the tan in that shawl. I love butterflies and was so excited when this stamp set appeared in our catalog—and now it's on its way out! As I sit here looking at the card, I wish I had thought to use the Fluttering embossing folder on the strips.  Note: when using the Bold Butterfly Framelit to cut out the butterfly, wait to stamp your butterfly body in Chocolate Chip until after cutting it out.  You'll also want to curl your wings a little, using your bone folder. Products Used: Watercolor Wi...

The Black Ice Technique

Image
I have had a great deal of fun playing with the Black Ice Technique developed by Melissa Kerman and you will see a few posts showing this technique. I find it is a great technique for masculine cards, but can also be made more feminine by adding printed backgrounds, which is what I did for this card that we made at my March stamp class. This card utilizes our Fresh Fig In Color for the background and for the card base. I did "grunge" the 4" x 5-1/2" piece of  Fresh Fig Fresh Florals Designer Series Paper by dragging the Basic Black Archival ink pad across it. I simply tipped the pad so I was using only the edge as I dragged it down, turning the paper and doing so one again. I used a very light touch so as not to dirty the paper too much. For the "black ice", I used a piece of 3" x 3-1/4" Silver Foil And dragged the ink pad across its surface in the same way. Only the archival ink will stick to the foil, according to Melissa. You may wish to...

Cozy Cottage

Image
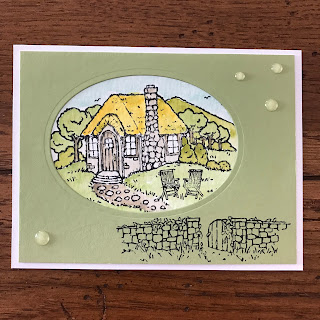
I love this stamp set and wanted to come up with a unique design for a card using it. I think I succeeded. The Cozy Cottage set is a hostess stamp set in the Occasions Catalog. I used my Aqua Painter to watercolor the image. I  used Old Olive and Pear Pizzazz to get different shades of green for the mountains, trees, shrubs and grass. I love the fact that the Glitter Enamel Dots come in varying shades, which make them easy to use. I also love the fact that they are placed on transparent sheets so I can lay them against my card before removing and attaching them. Products Used:  Cozy Cottage rubber stamp set (7), W 145940; C 145943; $17 and $12 hostess dollars, respectively 6" x 9" Watercolor Paper (5), 122959 $5.00 Whisper White  8-1/2" x 11" Thick Cardstock (24), 140272, $7.00 Pear Pizzazz 8-1/2" x 11" cardstock (24), 131201, $8.00 Basic Black Archival Stampin' Pad, 140931, $7.00 Crushed Curry Classic Stampin' Pad, 131173, $6.50 Crumb...

Another Card Using the Eclipse Technique

Image
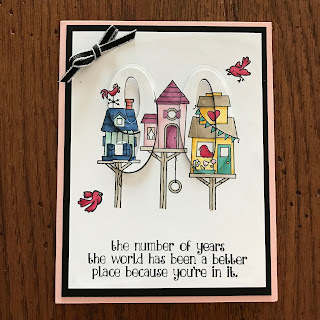
As you can tell from a previous post as well as this one, I know a number of people who have reached a new decade. I am loving the Flying Home stamp set colored with Stampin' Blends and then cut to accomplish this new favorite technique. At this point I have managed to use every image in this set, except the little bumble bee and butterflies. Look closely and you will see the raised 90 on this card front. Products Used: Flying Home Rubber Stamp Set (8), W 145926, $25.00; C 145929, $18.00 Number of Years photopolymer stamp set (29), 140653, $27.00 Whisper White 8-1/2" x 11" card stock (40), 100730, $9.00 Basic Black 8-1/2" x 11" card stock (24), 121045, $8.00 Powder Pink 8-1/2" x 11" card stock (24), 144244, $8.00 Cherry Cobbler Combo Pack Stampin' Blends (2), 144575, $9.00 Bermuda Bay Combo Pack Stampin' Blends (2), 144600, $9.00 Daffodil Delight Combo Pack Stampin' Blends (2), 144603, $9.00 Crumb Cake Combo Pack Stampin' B...

Friendship's Sweetest Thoughts

Image
Dear friends of my deceased parents have experienced a great deal of difficulty in the last few weeks. Ruth, who has MS, fell and broke her leg and is still in rehab, although gaining strength and control. When at the hospital for her leg, her husband fell down a flight of cement stairs when going for his car, resulting in a broken spine and a sever concussion. His pain has been severe but it is finally receding and he's in physical therapy. He is well enough now to complain and is hoping to be sent home by Monday. Needless to say, I have sent them a number of cards. They have not been able to see each other because they are in different facilities. And their 62nd anniversary is coming up as well as Ruth's birthday. Anyway, when playing with one of my new sets, I made this card with Ruth in mind. I had planned to use Calypso Coral so I could use the shimmer ribbon from the Sale-a-Bration catalog but grabbed the wrong watercolor pencil, Pumpkin Pie. It still looks great, but I...