Posts

Showing posts with the label Christmas

Lanterns and tags

Image
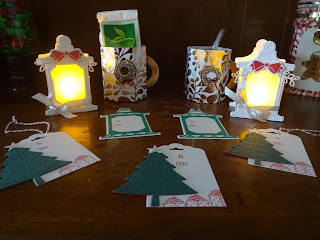
I found the directions for these lighted lanterns on pinterest. After making the lanterns, I decided the same framelits would make great gift tags. If you want the stamp set and framelits, time is running out because the holiday catalog expires January 3rd. This bundle is not being carried over. I love the LED tealights for this project! I had some others that were not LED and the light just didn't show through the vellum. The directions I downloaded from pinterest had me cut the Whisper White Thick card stock a little two small. If you cut three pieces 2-3/4" x 3-3/4" it will be much easier to cut out the lanterns. The tags are simply the front portion without cutting an opening (there is a die for that) for the vellum. I still cut with the plain lantern frame as well as the detailed lantern frame. By using the two different colors (Whisper White and Emerald Envy), you can easily tell which was which. My "to-from" stamp is from the retired "Wondrou...
December Class Projects

Image
What fun we had making Christmas gift tags and designer mugs and little lanterns that hold tea lights! More details in a future post.

Musical Season

Image
I tried to resist purchasing yet another Christmas stamp set, but I just had to have this one. We made this card as well at my October stamp class. Berry Burst, one of our in-colors, seemed to fit the designs of this stamp set, so I used that for all the stamping except the Sheet Music, which was done in Basic Black, of course. I stamped the pattern around the edges of the 4" x 5-1/4" Berry Burst card stock using the same color ink. I then added the 3" x 4" "Sheet Music" to the center. After stamping the instruments in Berry Burst on Whisper White, I cut them out using the coordinating dies. The new Champagne Foil was perfect for the French Horn. Products Used: Musical Season rubber stamp set (7), W 144814, $25.00; C 14411, $18.00 Musical Instruments Framelits Dies (6), 144677, $29.00      [Bundle and save: W 146045, $48.50; C 146049, $42.25] Whisper White 8-1/2" x 11" card stock (40), 100730, $9.00 Berry Burst 8-1/2" x 11" c...

Christmas Projects

Image
During September and October, stampers (especially hosts) can earn this great Christmas stamp set that is not included in any of our catalogs. Watch the video below and see some great projects made with it. 

More Christmas Tags

Image
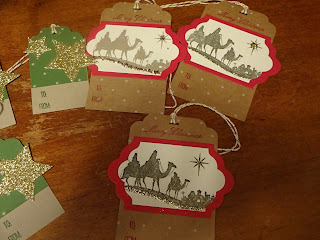
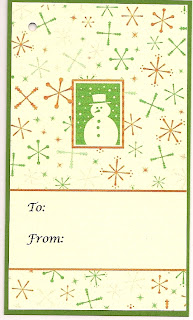
I've been super busy trying to sort through unused cards (I have to admit I have more than any one person can possibly use) in hopes of selling some of them at the Christmas Bazaar. And in the midst of all that, I've been stamping and punching and threading more gift tags to sell. Here are a few of them: They are all using retired cardstock. The wisemen are from a discontinued stamp set, but the snowmen are current. The stars are Gold Glimmer Paper cut with framelits.  Such fun! I've made so many Christmas gift tags that if they don't sell, I'll be set for years!

Stocking Gift Tags

Image
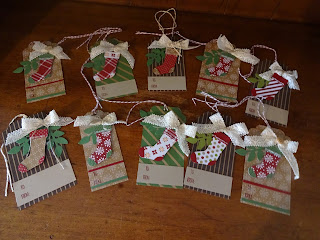
I've had great fun using the retired stocking punch and retired Christmas Designer Series Paper as well as the discontinued lace on these gift tags. We even had heavy-weight Christmas card stock one year that I've used  for the base tags. I love the way they turned out. And they were great fun to make. These are also for the upcoming Christmas Bazaar.  My thought is that the recipients of these tags could cut off the To/From section and use them as ornaments, especially because even the reverse side is decorative. (Sorry the above close-up is blurry; must have moved...)

Tag-Ornaments for Bazaar

Image
I made these several years ago for another bazaar and they were good sellers. So I decided to make more for the Christmas bazaar at LeTourneau Christian Center the first weekend of December.

Snow Way!

Image
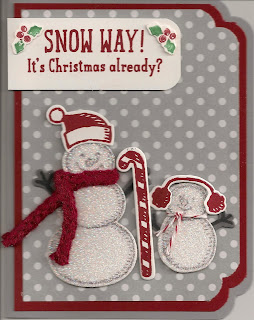
I fear I've fallen behind on my blogging. My last stamp class featured the bundle that includes the Snow Place stamp set and the Snow Friends Framelits Dies. I was also playing around with the new Curvy Corner Trio Punch, which gave the unique shape to this card. Although I chose the silver page from the Neutrals Designer Series Paper Stack, I paired it with the Smoky Slate cardstock, which doesn't look too dissimilar when the card is assembled. It amazes me that the framelits set includes a die for even the smallest shapes in the stamp set. For the scarves, however, I decided to use some retired Cherry Cobbler cord (you could always use yarn) and Cherry Cobbler Baker's Twine instead of the stamped image with its coordinating die. I had never before tried stamping on our Glimmer Paper, but tried it on a piece of Dazzling Diamonds—and it worked! Perfect for snowmen! Products Used: Snow Place stamp set (22 photopolymer stamps), 139738, $26 Snow Friends framelits Die...

Ornament

Image
We also made an ornament at my November stamping class using our Simply Pressed Clay (2.4 oz. 130685, $6.95), some re-inkers and a cookie stamp (see page 199 in the core catalog). After working the ink into the clay, we rolled it into a ball and pressed it into a circle using a cookie stamp. The one I used is from the original set but I think the mitten on the current set of cookie stamps would be just as adorable. You could even color the mitten with a Stampin' Write Marker. When we had the ornament we wanted, we threaded a large-eye needle with silver ribbon (10 yards, 132137, $4.95) and pushed it through the soft clay. It takes 24 hours to dry completely. My clay is colored with Marina Mist ink refill, although I offered the ladies a choice of Night of Navy or Daffodil Delight ink as well.

Christmas Tags

Image
Part of my November stamp class included Christmas gift tags. They were so much fun to make and not hard at all!  The tag below uses the Scalloped Tag Topper punch (133324, $22.95), Wondrous Wreath stamp set (9 Photopolymer stamps, 135047, $25.95) and the To & From stamp (1wood-mount stamp,13191, $6.95). I used the Cherry Cobbler Classic Stamp Pad (126966, $5.95) and Cherry Cobbler Baker's Twine (25 yards, 123125, $2.95) to complete the tag.  For the star tag, I used a Baked Brown Sugar Stampin' Write Marker (5 in-color markers, 131260, $14.95) to color the points of the largest stamp in the Bright & Beautiful set (8 stamps, W 135026, $32.95; C 135029, $24.95), which I then stamped on Very Vanilla card stock (40 sheets, 101650, $8.50) and cut with one of the framelits in the set of Stars (5 layering dies, 133723, $26.95). The Baked Brown Sugar card stock (24 sheets, 131296, $6.95) was then cut with a framelit the next size up.  The Baker's Twine is Metallic ...

A Christmas Thank You

Image
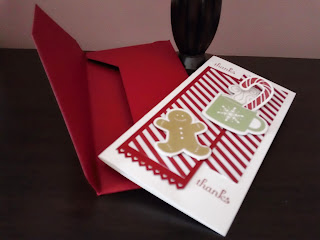
As I played with the Envelope Punch Board, I wanted to see what an envelope made from card stock would be like. In the process, I made a card to go with it. I doubt I would make more envelopes from card stock simply because of the extra weight if sending through the mail instead of hand delivering. Then again, they would be great for those times when a card is thick with layers or bling, especially some of the bling that tends to poke through regular envelopes. Although the word "thanks" is from the Fabulous Phrases stamp set, the other images are from the retired Scentsational Season stamp set. I don't think I'll ever part with that set, especially since I also have the coordinating framelits for cutting things out. The striped dsp is from the Season of Style 4½" x 6½" Designer Series Paper Stack (48 sheets for $6.95; 132181), although you will also find it in the 12" x 12" Season of Style Designer Series paper (12 sheets for $10.95; 132340)...

Gift Card

Image
A few scraps of paper and I designed a quick and easy gift card—the kind that accompanies a gift. A 3" x 6" piece of Whisper White card stock folded in half with a scrap of designer paper, a coordinating stamped image, and a scrap of contrasting card stock were all it took for this simple card. Add an envelope from another piece of designer series paper (yes, I used retired paper from our paper stacks, but we still have the paper stacks in all color families, albeit with different designs), using the new Envelope Punch Board, of course! The ladies who were here this morning were so enthusiastic about the projects we made. I love their enthusiasm, which is payment in itself for all the time I spend designing and preparing. I know Monday's group will be just as responsive. I mounted the two greeting stamps from the Wishing You stamp set on one block before inking it up and stamping inside the card. I even stamped the little tiny gift package on the back of this cute lit...

Hershey Bar Package

Image
The envelope punch board is so versatile! Here is a package made with this new tool, a package that holds two Hershey candy bars. Now if I can just avoid eating the candy bars before giving them away! I think the strip of Modern Medley Designer Series paper adds a touch of elegance. Of course, you could use the same box for any occasion, not just Christmas! And there is absolutely no stamping on this project, which I am teaching at my stamp class this weekend. Products Used: Basic Black 8½" x 11" card stock (24), 121045, $6.95 Cherry Cobbler 8½" x 11" card stock (24), 119685, $6.95 Modern Medley 12" x 12" Designer Series Paper (12), 126926, $10.95 Cherry Cobbler 1" Stitched Edge Grosgrain Ribbon (10 yards), 132135, $8.95 Envelope Punch Board, 133774, $19.95

Firecracker Box

Image
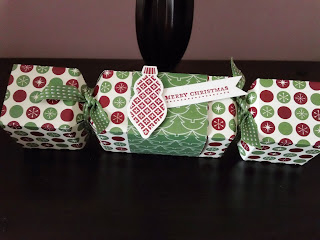
Another item we are making at my stamp class this weekend is this adorable firecracker box filled with Hershey Kisses.  Yes, I'm using retired designer series paper, but I liked last year's Christmas paper so much that I stocked up on more than I could use up. Plus I never ordered the 12" x 12" Christmas designer series paper this year and it takes a piece of 6½" x 8" dsp to make this box. My class features the new envelope punch board and, regardless of the paper, the attendees will know how to make more in the future. They would be great party favors for any occasion, from holidays to birthdays to just plain fun. Products Used: Ornament Keepsakes stamp set (9), W 128048, $34.95; C 128051, $25.95 Teeny Tiny Wishes stamp set (24), W 128748, $36.95; C 127802, $26.95 Whisper White 8½" x 11" card stock (40), 100730, $8.50 Be of Good Cheer 12"x 12" Designer Series Paper, retired Cherry Cobbler Classic Stampin' Pad, 126966, $5.95 ...

Angel Ornament

Image
We made this little angel ornament at my October stamp class. Isn't she cute? We used lots of punches along with the Gift Bow Bigz L Die in the Holiday Catalog. From another blog, I learned a neat trick for making the eyes: punch holes from scrap paper with the half-inch circle punch and trace the bottom edges. However, I changed it just a little and punched two holes next to each other and kept the scrap with the holes as a template and trace inside the lower edge of the holes. Then just add eyelashes after removing the templates. The templates are easy to keep for future projects. Although you can't see it, I did include a loop of Baker's Twine attached behind the head with another circle behind her face to cover up the ends. Products Used: Everything Eleanor stamp set (8), W 131987, $36.95; C 124164, $26.95 Teeny Tiny Wishes stamp set (24), W 128748, $36.95; C 127802, $26.95 Whisper White 8½" x 11" card stock (40), 100730, $8.50 Blushing Bride ...

Christmas Punch Art

Image
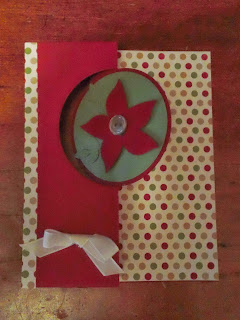
This Circle Thinlit card has no stamping on the front. Instead I used the wings of the Bird Builder punch to make the petals of my poinsettia and mounted them with Stampin' Dimensionals. I shortened the punched branches and tucked them beneath the  petals and added a button for my flower center. A little taffeta ribbon and some Season of Style designer paper finished it off. All I needed was the greeting from the Delightful Dozen stamp set and it was ready to go. [The first photo shows the front of the card; the second is the open card.] A tip for using the thinlits: To save paper, cut your card stock 5½" x 6" and line up with the thinlit. For my designer paper, I cut my strip 5½" x 3" and lined it up with the wide portion of the thinlit so the circle cuts would line up. I did have to trim a little off along the score line, but it helped the dsp to fit perfectly and enable the swing of the circle. Products Used: Delightful Dozen stamp set (12), W ...

Glittery Snowflake

Image
When I showed this card to my husband, all he said was, "Fancy". Sigh! But I think it is exquisite. It could be a Christmas card, a winter anniversary or birthday card, or simply a pretty note card. But we will make it at my September Christmas card class. We could add a Christmas greeting from Teeny Tiny Wishes punched out with the Word Window punch and protruding between layers of the snowflake or across the bottom. But I decided I like it as it is. In all honesty, I wasn't going to order the Festive Flurry stamp set because I really loved the Serene Snowflake set from last year's book that is still available for sale. But this set comes as a bundle with framelits to cut out the snowflakes, so that made the decision for me.  And now I love it! Products Used: Festive Flurry Bundle, W 133284, $54.95; C 133285, $46.95      Festive Flurry stamp set (4), W 131778, $39.95; C 131781, $29.95      Festive Flurry Framelits (4), 132193, $24.9...

Simplicity for Christmas

Image
Well, I ran out of cards. Just didn't have as many as I thought I had once I started sending them out. But that's okay, because I came up with an extremely easy to replicate design and whipped off another dozen cards. Granted, I used leftover Christmas designer paper from last year's Holiday Mini Catalog, so that's retired. The stamp set first appeared in that same mini catalog, but is in our current core catalog (Christmas Lodge). I actually got the idea for this card from some tags I designed. When I discovered how easy it is to read or view images stamped on this particular dsp, I decided to try a card. Here are the tags I made (I grabbed Gumball Green instead of Garden Green for the one, but the Garden Green of the plaid is narrow enough that I don't think you notice the mismatch that much):

Some Christmas Tags

Image
In the process of wrapping Christmas gifts, I needed a few more tags. I decided to try making one with My Digital Studio; that's the first tag below. After printing it, I matted it on a piece of Gumball Green card stock and punched my hole. If my printer hadn't been almost out of color ink, I would have printed a bunch of them because I really like the way it turned out and it would have saved so much time. Another year I think I'll design them to coordinate with my wrapping paper and print a whole bunch of them. This second card was made using my Big Shot and the Window Frames Framelits Dies. I also used the Needlepoint Border Textured Impressions Embossing Folder, part of my pre-order. I had to emboss these cross stitches the old-fashioned way: I used my stylus. Actually, I ran it through the Big Shot first, but found that as I rotated my card stock, the folder flattened the other edges. But at least I could see where to press with my stylus. The stamp set is "M...

Including Stamped Cookies

Image
Another project we made at my recent stamp class was this cute little "yum" pocket bag to hold a gift of cookies. I even provided the cookies stamped with our cookie stamp! Recipes are included when you purchase our Sweet Pressed Cookie Stamps. The Holidays set of silicone stamps includes a jack-o-lantern face, a snowflake and a heart. Each set comes with a wooden handle and the silicone slips over the flat end. So easy! And the dough doesn't stick to the silicone stamps. The photo below shows off the cookies. The above sample was made with paper from the Brights Collection Designer Series Paper Stacks, but we used Real Red and the Old Olive papers from the Polka Dot Parade dsp for the class. I didn't have enough of the Polka Dot Parade in those colors for everyone at my class. We colored the leaves on the "Yum" stamped image with a blender pen and Old Olive ink. I did use up some of my old retired ribbon on this project. The dsp was cut 6" x...