Posts

Showing posts from March, 2017

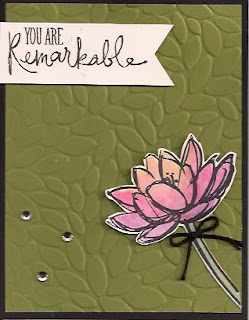
Rich Razzleberry Remarkable Flower

Image
Looking for stamp sets for use with my watercolor pencils, I found I had very few suitable sets. However, the Remarkable You set works well and I haven't used it as much as I should. I am finding I like it remarkably more than I thought. It just takes using those stamp sets. I would suggest you look through your sets and find one you never use and force yourself to design with it. There was a reason you bought that stamp set in the first place. Anyway, this watercolor technique involved wetting the paper first. Now, before I watched the video instructions, I thought that meant dipping the paper. On the contrary, we merely used the Aqua Painter to wet the section we planed to color (I did this for just one petal or leaf at a time) and then colored with the watercolor pencil. Made the colors remarkably vivid! I think this is one of my favorite cards. Oh, you need to color only part of your image and then pull the color to the outside edges to give the shaded effect. You can probabl

Remarkable You for Easter

Image
One of the lessons on using watercolor pencils was using colored cardstock. Since I didn't have the stamp set that was being used, I totally redesigned the card, making it an Easter card. I'm not sure if I like using the white pencil or not. I have used it to lighten my coloring, but this is the first I've used it on colored cardstock. I added a little Basic Gray for shading. I had some black grosgrain ribbon on hand that we no longer carry and added that to the card, but you could easily use a 5/8" strip of Basic Black cardstock. I never noticed that I had scanned this card crookedly, but you get the idea, I'm sure. The card base is Whisper White, although it's hard to tell that there is a frame of white around the Peekaboo Peach. Products Used: Remarkable You rubber stamp set (6), W 139891, $45; C 139894, $33 Crazy About You stamp set (33), W 138856, $52; C 138859, $39; P 137137, $25 Whisper White 8-1/2" x 11" cardstock (40), 100730, $9 Pe

Hey, Chick! No Lines!

Image
Erica Cerwin called this technique "No Line" watercoloring. We stamped the image in the same color ink as the watercolor pencil we used, Daffodil Delight in this case. Although we used the Aqua Painter for the body, I used the Blender Pen for the details around the chicken's face. What a fun card. You'll see the burlap ribbon and Pumpkin Pie dsp. What I did differently from her instructions was the strip on the left side of the card: I had a scrap of watercolor paper that I colored all over with the Pumpkin Pie watercolor pencil and then blended with the Aqua Painter. After it dried, I added texture with a stamp from the Touches of Texture stamp set. Erica reinforced the adhesive for the Burlap Ribbon with Stampin' Up!'s stapler, but I'm hoping the Fast Fuse holds it forever! Actually, I don't own the stapler but I'm thinking it might be a wise purchase for the future. The "dirt" beneath the chicken is freehand with the Early Espresso

Avant Garden

Image
I want to be sure to post all the cards I've made so far with Sale-a-Bration items before the catalog expires March 31st. I really didn't know what I wanted to do with this stamp when I pulled it out and stamped on the card stock initially. I knew I wanted to incorporate some Designer Series Paper, but wasn't sure what colors I would use or anything. Then I decided to stamp the image in Old Olive and that set the course for the rest of the design. I love the Serene Scenery Designer Series Paper Stack so much that I actually ordered another pad, and this paper comes from my supply. And I've also come to love the Stylish Stems Framelits from the Occasions catalog that coordinates with the Special Reason stamp set, not just for the flowers and leaves, but also for this label in two sizes. Because there is a wee bit of color on this dsp, I took my Calypso Coral watercolor pencil and shaded the flowers just a tad. I fear that pretty Old Olive ribbon, however, is no longe

Taco 'Bout You

Image
If I could stop ordering so much, I wouldn't have so many Sale-a-Bration stamp sets that I initially thought I wouldn't want. However, the play on words in this set is so fun. And I can see using these stamps with my grandchildren, as well as adults. You'll see the saying on this one at the bottom says, "Let's taco 'bout how awesome you are!" What a great card to just express appreciation to someone special. I also used the watercolor pencils for this card. Most of the cards in the class were done on Shimmery White Paper, but this one uses watercolor paper. Since the watercolor pencils are primarily from our brights collection (Calypso Coral is not) plus three neutrals (Early Espresso, Basic Black and Basic Gray), the purchase of a Designer Series Paper Stack in our Brights Collection was the perfect accompaniment. This card features Bermuda Bay and Calypso Coral with some Daffodil Delight, Old Olive, Basic Gray, and Basic Black. Some discontinued Cris

Watercolor Dip

Image
I didn't think I was interested in this stamp set, "Hey, Chick" when I saw it in the Sale-a-Bration catalog, but I've seen a number of great ideas since. Plus, we were using this stamp set for the watercolor technique class I took on-line. For this particular technique, I dipped the Real Red and Early Espresso pencils in water before coloring. This technique produces bold colors. Hey Chick stamp set is found on page 17 of the catalog. I have a ton of Early Espresso baker's twine, which is no longer available, but found it just the thing for this card design. Plus, I was using up my Early Espresso Candy Dots from our previous annual catalog. By the way, I have come to love the layering dies—circles, ovals and squares. Obviously I used the circle dies here. For all the coloring done with the pencils, I stamped the images with our Archival Basic Black ink pad and usually heat set it.  When using Daffodil Delight to color and paint, it is crucial to heat set the

Another Page Inside the Lines

Image
I've had so much fun using the Sale-a-Bration designer paper! But I had only used one of the sheets during my on-line class, so I decided to experiment with another sheet. You'll see some of the same techniques but with a twist for three totally different looks. The first card also uses the Metallic Ribbon from the Sale-a-Bration mini catalog. I fussy-cut the flowers on the second card using ideas from one of the samples in the brochure. SAB is winding down and comes to an end on March 31st, so you need to place your orders as soon as possible. You receive one item free for every $50 dollars you spend. The items seen on this post are found on page 11.

Setting Sun

Image
Another technique from my watercolor class is a setting sun. The colors for this surprised me: Daffodil Delight, Pumpkin Pie, Real Red and Rich Razzleberry watercolor pencils. Once again, your brush strokes with an Aqua Painter run from the lightest color to the darkest. The class used the Birthday Fiesta stamp set with its coordinating Framelits, neither of which I possess. So I chose to do some more fussy cutting after watercoloring the deer from the stamp set, In the Meadow. And our Paper Snips make fussy cutting so easy because the tips are precision-ground so they cut to the end of the blades. Products Used: In the Meadow rubber stamp set (8), W 140751, $28; C 140754, $20.00 Pumpkin Pie 8-1/2" x 11" cardstock (24), 105117, $8.00 Shimmery White 8-1/2" x 11" cardstock (10), 101910, $8.00 Basic Black Archival Stampin' Pad, 140931, $7.00 Watercolor Pencils (13), 141709, $16.00 Aqua Painters (2), 103954, $17.00 Early Espresso Baker's Twine (disc

Watercoloring "Inside the Lines"

Image
I have ordered more than one pack of Inside the Lines Designer Series Paper because I love it. And I'm finding so much versatility with it. Of course, I really should move on and use some other sheets in the pack... Because of the watercoloring on-line class I'm taking, I used two techniques on this card front: shading and mixing colors. I'm loving the Watercolor Pencils that coordinate perfectly with our colors! So much fun to color and then smooth the coloring out with the Aqua Painter. And I find myself adding a little clear Wink of Stella to the bee whenever he shows up on the paper. Products Used: Crazy About You stamp set (33), W 138856, $52.00; C 138859, $39.00; P 137137, $25.00 Melon Mambo 8-1/2" x 11" cardstock (24), 115320, $8.00 Basic Black 8-1/2" x 11" cardstock (24), 121045, $8.00 Inside the Lines 12" x 12" Designer Series Paper (12), free with $50.00 purchase Watercolor Pencils (13), 141709, $16.00 Aqua Painters (2), 1

Remarkable

Image
I struggled to find a stamp set I had that would work for the lesson on mixing colors. Then I debated whether to mix colors on each petal or on the flower as a whole. Obviously, I chose the latter and I'm glad I did. Of course, I had to fussy cut this flower, but I find that rather relaxing. To get this effect, I used my Rich Razzleberry watercolor pencil on the bottom and curving upward. I followed that with Melon Mambo and finished with Daffodil Delight. The stem is colored in Old Olive and a touch of Pacific Point. Two tricks you need to know if you try this technique on your own: First, heat set the archival ink whenever using Daffodil Delight. I'm not sure why, but this color tends to cause the black to bleed while none of the other colors do. Second, apply your Aqua Painter to the lightest color first and pull down. Obviously, your brush will still pick up some of the darker color, affecting the lightest. But if you pull your colors up from the darkest color, your lig

Golden Sympathy Card

Image
When a dear friend's mother died, I wanted to make her a special sympathy card, especially because my friend is also a stamper. The Big Shot makes these fancy cards so easy! I used the Rose Wonder stamp set and coordinating Rose Garden Thinlits to make this card. Although I could have stamped the frame within the cutout for "With Sympathy", I chose to cut the embossed words with the framelit and adhere it to a piece of Gold Foil. I then took my paper snips and cut a frame around that piece. I finished it off with a gold enamel heart. I love that Stampin' Up! came out with the Die Brush with foam pad to make it so much easier to remove delicate cut-outs from the dies. Products Used: Rose Wonder photopolymer stamp set (14), 140697, $27.00 Rose Garden Thinlits (5), 140619, $31.00 Very Vanilla 8-1/2" x 11" cardstock (40), 101650 $9.00 Gold 12" x 12" Foil Sheets (2), 132622, $4.00 Metallic Enamel Shapes (100), 141678, $7.00 Embossing Buddy,

Masks and Glitter

Image
These cards were also part of my February class. Such fun! And so easy to make it sparkle when all you have to do is layer different sized stars cut from different papers using the Stars Framelits. This same card could easily work for a graduation card or some other milestone. For the background I simply used VersaMark and a sponge dauber and the and the Stars Decorative Mask. Then I heat embossed using our White Stampin' Emboss Powder. Using an Aqua Painter, I washed over the stars with Soft Sky ink. A couple "washes" makes it darker. But take care not to rub off the surface of your Shimmery White paper. I have since discovered that the Multipurpose Liquid Glue applied with the wide end helps the paper to lay flatter (it curls during heat embossing and "washing"). I decided I really like the effect of the extra layer of Glimmer Paper. You can cut the large star from the center of that piece to save paper, a neat trick when using the more pricey Glimmer Pape

Another Fancy Fold Card With Serene Scenery DSP

Image
By the time I design (or CASE) a card for my class and then make another each time I give the class, I accumulate variations, especially when using Designer Series Papers. Notice how the change in paper lends itself to a more masculine card, even though either piece would work for men. Once again, these cards are from my February card classes.

Double Z Card Variations

Image
I know I'm way behind in posting on this blog. I have photos of variations of the cards we made at my February stamp class and thought you might like seeing how much difference little changes make. This card uses the double z fold technique. Different papers, different placement of balloons... The Balloon Bouquet punch makes it so easy. Very little stamping on these cards. Most of the designer paper used here is from the Serene Scenery Paper Stack, the close-up card uses last catalog's Cherry on Top paper stack.

Bookmarks

Image
Thought I would share a picture of the bookmarks I made for the ladies in my core group, Community Bible Study. I strongly encourage my group to memorize the verses we are given and to practice them so they do not lose them. So I decided to add the reference Psalm 119:11 to the solid portion of the bookmarks and passed them out the morning of our Valentine brunch. So simple! Just some old Daffodil Delight Designer Series Paper cut with one of the So Detailed Thinlits dies and adhered to Melon Mambo card stock. You can't see it very well in this photo, but I hand wrote the reference with Melon Mambo Stampin' Write Marker.

Sale-a-Bration Video

Image

Perfect Mix Bookmark

Image
Taking a watercolor class from Erica Cerwin of Pink Buckaroo Designs, I made the following bookmarks, or adornment for a gift bag. I enclosed one in my sister's birthday gift, a new cookbook. The bowl is stamped on Shimmery White cardstock and then colored with Bermuda Bay, Early Espresso and Basic Gray watercolor pencils and then blended with an Aqua Painter. My shading still needs a little work, but I'm still pleased with the results. I couldn't make up my mind whether I preferred the smaller scallop circle frame or the larger one, so I made one in each. Products Used: Perfect Mix stamp set (9), W 142930, $27.00; C 142933, $19.00 Whisper White 8-1/2" x 11" cardstock (40), 100730, $9.00 Bermuda Bay 8-1/2" x 11" cardstock (24), 131197, $8.00 Shimmery White 8-1/2" x 11" cardstock (10), 101910, $8.00 Brights 12" x 12" Designer Series Paper Stack (40), 138434, $22.00 Basic Black Archival Stampin' Pad, 140931, $7.00 Waterco

Sweet Cupcake

Image
I designed this card for my sister because she is a cupcake lover. I love the way it turned out. A piece of designer series paper from the retired "Cherry on Top" paper stack provides the background. My colors were chosen because I wanted to use the Blushing Bride Glimmer Paper for the cut-out "sweet" and the dsp.  A relatively easy card. By the way, you can stamp and cut the cupcake elements from the Whisper White cardstock that sits behind the designer paper because the holes won't show when you're finished. Saves cardstock! I see my image was slightly crooked on the scanner, but you get the idea. I could have added the candle flame if I had moved my doily down  to the bottom. Products Used: Sweet Cupcake photopolymer stamp set (24), 141498, $21.00 Whisper White 8-1/2" x 11" cardstock (40), 100730, $9.00 Pool Party 8-1/2" x 11" cardstock (24), 122924, $8.00 Blushing Bride 12" x 12" Glimmer Paper (2), $5.00 Delicat

Inside the Lines - or Out!

Image
Taking a watercolor on-line class, I discovered how great our Sale-a-Bration "Inside the Lines" Designer Series Paper looks when watercolored outside the lines! Here are three variations:  The one above doesn't show the green watercolor as much as the original card does.  You also cannot see the Wink of Stella added to the bumble bee.  The watercolor shows up better on these two cards. I merely colored around the edges of the designs with our new Watercolor Pencils and then used my Aqua Painter to pull the color into the background. Totally different feel from coloring each item, which I plan to do soon! Each card uses a different stamp set. Products Used: Fresh Fruit photopolymer stamp set (24), 141770, $27.00 Flourishing Phrases (18), W 141531, $49.00; C 141534, $37.00 Birthday Blossoms (8), W 139167, $27.00; C 139471, $19.00 Inside the Lines Designer Series Paper (12), 143830, Free with $50 purchase through March 31 Old Olive 8-1/2" x 11" cards