Posts

Showing posts from May, 2019

Quick Birthday Card

Image
Sometimes it's nice to just grab scraps sitting in my work area and put them together for a needed card. That's what I did for this card, a birthday card for one of my customers. That meant I couldn't use a card we have made in class before because she is one of my most faithful attendees. And this one also allowed me to use more of my departing In Colors!  I never liked Lemon Lime Twist, but since the gingham I have come to love it. And now it's leaving our book! These strips of gingham dsp were left after cutting the 6" x 6" pieces to fit the needs of other cards. The Healing Hugs stamp set is one of my favorites, probably because of the disINKtive stamp style. But there are many more appearing in the new annual catalog. The greeting on this card, however, is from the old Birthday Blossoms stamp set. Products Used: Healing Hugs cling stamp set (9), 148223, $21.00 Lemon Lime Twist 8-1/2" x 11" card stock (24), 144245, $8.50, retiring Whis

Crafting Forever

Image
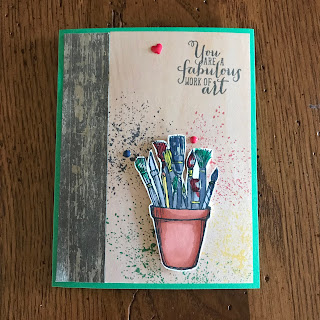
I discovered that one of my grandsons is interested in learning to sketch and even paint. A college student majoring in marketing, he has many interests. He plays violin and guitar and taught himself the keyboard. Definitely a creative young man. So I bought the Crafting Forever stamp set to make his birthday card, which I never photographed. This card is a variation of that one. I used watercolor paper for his card, but I didn't have enough left for my class to make the same one. So I altered it but used some of the same ideas. The Wood Textures designer series paper runs its course and I still have quite a bit to use up. I decided it would make a great background for this card, but still needed enough pieces for all my class attendees. That means some careful cutting and sometimes means not everyone will have the exact same piece. The words on this card are from the previously discontinued Work of Art stamp set and the paint splatters are from the retiring Touches of Texture

Floating Frame with the Painted Harvest Stamp Set

Image
Continuing to use the departing In Colors (in this case, Powder Pink and Lemon Lime Twist), I taught these cards to my stamp class last week. I used the removable tape method for these. Choosing the Painted Harvest stamp set meant we needed to do quite a bit of fussy cutting but I wanted to use larger elements. Plus, we could use the coordinating punch for the leaves. However, one of my ladies really struggled with so much fussy cutting. We used the Stamparatus to stamp the flowers, stamping each one twice to darken the ink. The flower centers are So Saffron. After stamping and cutting or punching out the elements, we arranged and adhered them to a 4" x 5-1/4" piece of card stock with removable adhesive. Then we cut out the center with the Rectangle Stitched Framelits Dies and began transferring each flower and leaf piece one by one to the card fronts using Stampin' Dimensionals. I am saddened to lose the Best Birds stamp set in the new catalog, although there

Floating Frame Technique with Hold On to Hope Stamp Set

Image
This set of cards was made without the Press 'n Seal.  I do think that if I had made the card base Whisper White just like the frame, it would have looked more like it was floating. I believe it was an Australian demonstrator who demonstrated this technique using removable adhesive. And, no, Stampin' Up! does not carry removable adhesive, so you have to purchase it at a craft store. However, you could always use your SNAIL adhesive and rub away most of the stickiness, but if your pieces are fragile, you might tear them in the process. Yesterday's post used two of our retiring In Colors and today I'm using another. The Fresh Fig makes this card absolutely exquisite. At least I think so. With this set, I was able to die cut all the elements before attaching them to a 4" x 5-1/4" piece of card stock, using removable adhesive. I then used my Rectangle Stitched framelits Dies to cut a rectangle from the center. Next I peeled each element off, one at a time,

Floating Frame Technique with Tea Together Stamp Set

Image
I think I must have watched every video produced on how to make a card that looks like it has a floating frame.  Jennifer MacGuire apparently created the technique using Press 'n Seal paper. That trick does make it easy to transfer the elements, but I struggled every time to peel off the Press and Seal without removing the top layer of my cardstock, taking the color with it. So I had to add more color with my markers after I'd finished. Plus there is a certain sticky film that remains behind on my card stock. I eventually came up with my own way of doing it, but the cards I'm showing here were my first ones and used the Press 'n Seal. They look great in spite of my struggles (just don't look too closely). I stamped and colored the flowers from the Tea Together stamp set and then die cut them. Next step was to arrange them on a 4" x 5-1/4" piece of card stock which was later discarded. Then I laid a piece of Press 'n Seal over the top, pressing it

Healing Hugs Stamp Set

Image
Although I don't make and send too many get well cards, I suddenly had a need for a number of them. The fact that I love the Healing Hugs stamp set helped. And the need was timed just right with my April stamp class. I am going to miss the outgoing In Colors, which I used on this card, especially the Berry Burst. There are years I love the In Colors more than other years, and the 2017-2019 colors fall in that category. To help us place all the stamped images, we stamped the rose on both the top layer and on a scrap. We then could stamp the leaves and other elements without worrying about overlapping the flower. After cutting out the rose on the scrap of Whisper White card stock, we added it to the card front with Stampin' Dimensionals. I also taught my class attendees how to make the flat bow, although I didn't put it on very straight. We fastened the ribbon around the top layer. Then we took a piece of ribbon and attached the ends with a glue dot forming a circle. A