I made these several years ago for another bazaar and they were good sellers. So I decided to make more for the Christmas bazaar at LeTourneau Christian Center the first weekend of December.
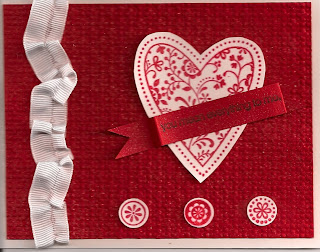
As much as I prefer scanning my cards over photographing them, I find there are some disadvantages. My little banner that is stamped with "you mean everything to me" loses the 3D look as it gets flattened by the cover of the scanner. Kyla and I were just playing around with ideas while she was visiting (did I mention, she's my new recruit?) and this was one of the cards I designed. Gathering the ribbon slightly, cutting out the heart image and folding and trimming the "banner" across the heart meant a little extra fussing, but I really like the result. When I was all finished with the card, I decided to add a little sparkle by spraying it with a mixture of Champagne Shimmer Paint and rubbing alcohol. If you look closely, you can see some of the sparkle that added to the card, including the ribbon. When you actually hold it in your hands, you can see the glittery shimmer much more easily. Although I'm thinking about Valentine's Day, this card is not exclu...
I have so many odds and ends of designer series paper that I decided it's time to try to use some of it up. My problem is that I order more than I can use because Stampin' Up! comes up with such pretty stuff! Anyway, this was specialty paper from last year's Occasions Mini Catalog. You probably can't see, but this paper has lots of sparkle on it, so I decided I needed to add a glimmer brad to the center of my stamped image. This card is also one of my large cards made to be passed around for many to sign. I haven't decided if I'm going to keep it for use, should the occasion arise, in my core group, Community Bible Study, or if I'll take it to church for our Adult Bible Fellowship aka adult Sunday School. When I make these cards, I merely fold one sheet of 8-1/2" x 11" card stock (usually Very Vanilla, as in this card, or Whisper White, but sometimes a subtle color so comments will be easy to read) and decorate the front. I put all verses on the ou...
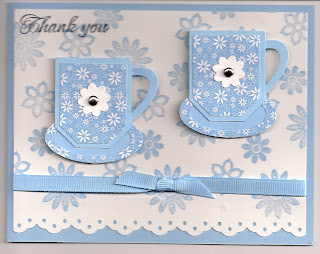
I'm back from our trip to Ohio where I thoroughly enjoyed time with old friends! I need a thank you note (several, actually) and decided to play with punches. I had taken sample cards with me to show to my old stamping friends, who raved over one of the cards utilizing punch art, so my enthusiasm for technique was rekindled! I made the tea cups below with both the tag and small tag punches and the small and large oval punches. I also used the Boho Blossoms punch for the white flower decorating the cup. The eyelet border was made with one of our newest punches. I used up some old designer paper with the bashful blue and whisper white card stock. Finally, I experimented with my ribbon and like the way it turned out as well as the ease with which it went together. I cut my bashful blue grosgrain ribbon about 6-1/2 inches. Before tying the knot in the middle, I inserted a small piece of the ribbon and tied the knot around it. Then I fastened the ends under the whisper white car...


Comments