Posts

Showing posts from October, 2015

Every Blessing Stamp Set

Image
Those who know me realize that I like to send cards that reflect the true meaning of Christmas. Consequently, I have a weakness for those more biblical stamp sets. Every Blessing is one of those. As I sought to design a card with this stamp set, I decided it would be much easier if I separated the star from the shepherds. So I used my old craft and rubber scissors to cut it off and trim the resultant stamps. Makes it so much easier than trying to ink part of the stamp and keep the other part clean and dry when using it in another place. I made two card using this method. We made this first card at my stamp class this week. The other one will be on display to showcase another design with the same color scheme. Products Used: Every Blessing stamp set (3), W 138806, $21.00; C 139919, $16.00 Smoky Slate 8½" x 11" cardstock (24), 131202, $7.00 Night of Navy 8½" x 11" cardstock (24), 100867, $7.00 Night of Navy Classic Stampin' Pad, 126970, $6.50 Si

Versatile Sparkly Seasons Stamp Set

Image
Even this chevron-printed circle is versatile! I used it for a pumpkin several posts ago. This time it's an ornament. I keep wondering if I should have ordered the bundle, but I'm managing just fine without it. The ornament topper with its hook is stamped on a piece of a Silver Foil Sheet and fussy-cut. To get inside the hook, I used a hole punch. The Christmas tree branch is actually the top of the evergreen in the Lovely As a Tree stamp set, which I've had forever, since well before it was available as a clear mount set. I added the ornament bulb last, using Stampin' Dimensionals to make it pop. Admittedly, I was a little disappointed when I realized the Boughs &; Berries Textured Impressions Embossing Folder was larger than a normal card size (4-1/2" x 6-3/16"), but I didn't worry when my card layer didn't quite reach the bottom of the folder. If I make this card again, I won't put it on a Whisper White card base; I'd simply make the

Shaker Card

Image
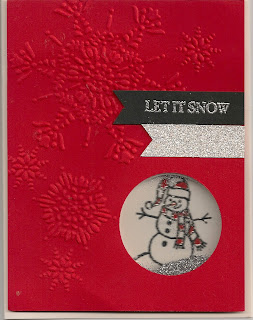
Since I have the Sparkly Seasons stamp set with all the snow globe options, I just had to try to figure out if the circular dimensionals from a previous catalog would fit the snow globe image. No. Too small. But I fit the snowman from that set into a circle anyway. Took a little fussing to figure out exactly how to manage it. Used a circle hole punch for the Real Red cardstock embossed with snowflakes (retired Northern Flurry TIEF). I stamped and heat embossed (black embossing powder) the snowman on a piece of Whisper White, colored the scarf and nose with markers, adhered a circular dimensional, poured in some silver glitter and lined it up with the hole in the Real Red piece. I had to trim some of the excess off, but it worked.

More Fun With Sparkly Seasons Stamp Set

Image
As I've said before, I'm just loving the Sparkly Seasons stamp set! Working with the Nutcracker version once again, I designed this card for stamp class this week. Our Glimmer Paper works so well for dressing up Christmas cards. And it fits with the greeting! This card has no fussy cutting involved. I have learned how to use lovely but flimsy Metallic Thread without struggling to tie it. For this card, I merely wrapped the gold thread around three fingers several times and pinched the resulting loops together before laying it on a glue dot. A clear button covered the glue dot nicely. [Yes, I'm afraid these particular clear buttons are no longer available.] Products Used: Sparkly Seasons Photopolymer Stamp Set (15), 139825, $26.00 Whisper White 8½" x 11" cardstock (40), 100730, $8.50 Old Olive 8½" x 11" cardstock (24), 100702, $7.00 Real Red 8½" x 11" cardstock (24), 102482, $7.00 Red 12" x 12" Glimmer Paper (2), $5.00 Tuxe

Nutcracker Christmas

Image
My previous post showed a ballerina in a snow globe using the Sparkly Seasons stamp set. A post before that used the same set for the pumpkin face made at my niece's birthday party. Here is another card made with the same set—a Christmas card using the nutcracker. There are just so many possibilities with this set! I used several markers to color in the nutcracker and surrounding gifts: Pacific Point, Daffodil Delight, Old Olive, Basic Gray and Cherry Cobbler. I'm actually designing for my upcoming class, but we won't be making this particular card simply because the designer paper is from a previous year's paper stack. Products Used: Sparkly Seasons photopolymer stamp set (15), 139825, $26.00 Teeny Tiny Wishes stamp set (24), W 128748, $37.00; C 127802, $27.00  Cherry Cobbler 8½" x 11" cardstock (24), 119685, $7.00 Whisper White 8½" x 11" cardstock (40), 100730, $8.50 Old Olive 8½" x 11" cardstock (24), 100702, $7.00 Old Oliv

Sparkly Ballerina

Image
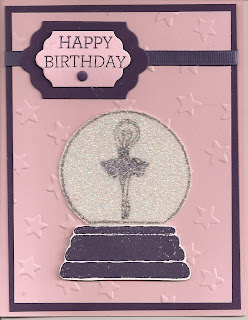
The card I made for my niece's birthday was a variation of the card shown below. I expect to give this to my granddaughter for her birthday tomorrow, although I wonder if the two girls will compare or notice the similarity. Hmm... With the assistance of my Big Shot, this is not a difficult card to make. I did not order the bundle, however, because I figured my Circles Collection Framelits would work and I couldn't see myself using the words since I don't do Halloween and I already have the Hello You Thinlits. However, this circle is in between sizes, so I ended up trimming the snow globe. Plus I "fussy cut" the base for the globe. So now I'm wondering if I should have ordered the Thinlits anyway. I do love the Sparkly Seasons stamp set! I have always had a special fondness for snow globes and have a small Christmas collection. And this set includes a pumpkin, a snowman and a nutcracker. Other stamps make it easy to convert your "globe" to an

Niece's Birthday Party

Image
My niece turned seven this week and my sister thought cardmaking would be a great activity during the party. So I designed a super quick, super easy card using our wonderful note cards so they would have envelopes to go with them. This was also a great opportunity to use some of the retired paper (the Pistachio Pudding that I love so much). I used just one stamp set, Sparkly Seasons (15 photopolymer stamps for $26, 139825). I used color-on-color for most of the stamping: Pistachio Pudding-inked leaves on Pistachio Pudding cardstock, Pumpkin Pie-inked design on Pumpkin Pie cardstock. Everything else is Always Artichoke. All the girls did very well. One even turned hers sideways to make it different from the rest. The 2½" Circle punch worked just fine for cutting out the pumpkin.

Time to Chill

Image
This is my final card from my class featuring the Snow Way and Snow Friends stamp and framelits bundle. We made two cards using the snowmen and two cards using the Penguin. Silver Encore Ink (no longer in our catalogs), Silver Sparkle Dazzling Details and Brushed Silver cardstock (you'll have to use the silver foil in its place) contributed to the iciness of the penguin's environment. I used a Tangerine Tango Marker to color the beak and webbed feet. Products Used: Snow Way photopolymer stamp set (22), 139738, $26.00 Snow Friends Framelits Dies (15), 139664, $27.00           Bundle: 140844, $45.00 Whisper White 8½" x 11" cardstock (40), $8.50 Neutrals Color Collection 12" x 12" Designer Series Paper Stack (40), 138435, $22.00 Pacific Point Classic Stampin' Pad, 126951, $6.50 Crumb Cake Classic Stampin' Pad, 126975, $6.50 Tuxedo Black Memento Pad, 132708, $6.00 Silver Sparkle Dazzling Details (0.6 fl. oz.), 127845, $2.50 Deco Labels

Snow Way!

Image
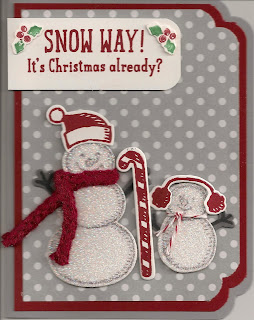
I fear I've fallen behind on my blogging. My last stamp class featured the bundle that includes the Snow Place stamp set and the Snow Friends Framelits Dies. I was also playing around with the new Curvy Corner Trio Punch, which gave the unique shape to this card. Although I chose the silver page from the Neutrals Designer Series Paper Stack, I paired it with the Smoky Slate cardstock, which doesn't look too dissimilar when the card is assembled. It amazes me that the framelits set includes a die for even the smallest shapes in the stamp set. For the scarves, however, I decided to use some retired Cherry Cobbler cord (you could always use yarn) and Cherry Cobbler Baker's Twine instead of the stamped image with its coordinating die. I had never before tried stamping on our Glimmer Paper, but tried it on a piece of Dazzling Diamonds—and it worked! Perfect for snowmen! Products Used: Snow Place stamp set (22 photopolymer stamps), 139738, $26 Snow Friends framelits Die