Posts

Showing posts from September, 2016

Gaining Independence

Image
My oldest grandchild decided it was time to leave the nest. He had been attending college and working part-time nearby. Since he's just not sure what he wants to do with his life, he decided to take time off from studying and work full-time while living away from home. Before he left (he's moving out of state to be near friends), we went to see him. I wanted to be sure I had a card for him to send him off with support and good wishes. I combined techniques, using dry-embossing, fussy cutting and water coloring. The embossing folder and the stamp set for the plain and the words are no longer available. The land formations are from the "In the Meadow" stamp set (page 129 in the core catalog). My colors were Soft Sky, Tip Top Taupe, Pool Party and Wild Wasabi. Water coloring was done using my Aqua Painters. I love those brushes because they are always wet—as long as you keep them filled with water.

Framelit Stencil

Image
I had so much fun designing cards with a fall theme and picking up new techniques while I was at it. I even learned to sponge properly as I made this card and then taught my sister stampers. In the past, I daubed my inked-up sponges but now I understand the importance of sponging off on scrap paper and then sponging in smooth circular motion to avoid the spotty look. I'm still trying to remember that technique because my natural method seems to be to bounce my sponge. I think this would make a great Thanksgiving card or a birthday card, depending on what you put inside. It could even be a thank you note. My first step was to make a stencil by cutting a maple leaf from scrap paper, using one of the Leaflets Framelits. I then held that on my Very Vanilla cardstock and started sponging, beginning with the lightest color ink. You'll see where I haven't quite perfected the technique. Anyway, sponging in circles I tried to avoid the center to give the sense of light, al

Autumn Basket of Wishes Card

Image
My customers voted to postpone our Foxy Friends class so we could do a class of Fall cards. One of the cards we made used the new Basket of Wishes stamp set and involved painting with Blender Pens. I love this stamp set. I the sunflowers in the basket with curved handles on a gift bag of sorts (see a previous post). There are strawberries and succulents, as well as a quart basket to choose from. Plus greetings! I was using up some Candy Dots and Pumpkin Pie cotton ribbon on this card, products that have been discontinued. Products Used: Basket of Wishes photopolymer stamp set (11), 142200, $17.00 Old Olive 8-1/2" x 11" cardstock (24), 100702, $8.00 Pumpkin Pie 8-1/2" x 11" cardstock (24), 105117, $8.00 Very Vanilla 8-1/2" x 11" cardstock (40), 101650, $9.00 Basic Gray Archival Stampin' Pad, 140932, $7.00 Miscellaneous inks: Crumb Cake, Always Artichoke, Pumpkin Pie, Old Olive, Delightful Dijon, and Pear Pizzazz Brick Wall 6" x 6"

Foxy Friend on a Stump

Image
I've come to love the Foxy Friends stamp set for fun cards. And they're not just for kids! When I started to work on this card I planned to make it at my upcoming card class featuring the Foxy Friends stamp set. However, I did so much fussy cutting that I decided it would be a display card rather than a class card. I began by embossing a 4" x 5-1/4" piece of Whisper White cardstock using the Woodland Textured Impressions Embossing Folder. I lightly sponged the trees with Chocolate Chip ink. For the grass, I crumpled a piece of Emerald Envy cardstock to give it texture and cut the curvy top edge with my paper snips. Products Used: Foxy Friends photopolymer stamp set (29), 141549, $27.00 Sheltering Tree photopolymer stamp set (14), 137163, $25.00 Whisper White 8-1/2" x 11" cardstock (40), 100730, $9.00 Emerald Envy 8-1/2" x 11" cardstock (24), 141415, $8.00 Emerald Envy Classic Stampin' Pad, 141396, $6.50 Delightful Dijon Classic St

Designing with Leftovers

Image
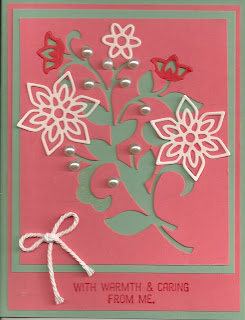
Sometimes I leave pieces of used card stock sitting around hoping for inspiration for future designs. That's how I came up with this card. The Flirty Flamingo card stock had been used to cut out the Flourish and just sat there begging to be used. I also had a scrap of Mint Macaron sitting on my table and decided the colors would work well together. Then there were the extra flowers I had cut from the Whisper White that worked nicely on the layers. I added the pearls and still thought the card needed a little something extra. So I grabbed a small scrap of Watermelon Wonder to cut out just the flowers using the same Flourishing Thinlit and slipped those into the openings on the flourish. A bow of Thick Whisper White Baker's Twine added the finishing touch. Products Used: Flourishing Phrases Bundle, W 142322, $70.00; C 142323, $59.25      Flourishing Phrases rubber stamp set (18), W 141531, $49; C 141534, $37.00      Flourish Thinlits (10 dies), 141478, $29.00 Flirty Flam

Annniversary Card

Image
My husband and I just celebrated our 47th wedding anniversary. Of course, I had to make the card. Admittedly I also try my hand at verse for the inside, although it's not the best poetry in the world. But I get to convey my own thoughts. I love this card, even if it does have some discontinued designer series paper and in color. But the depth of the colors and the fun of using the new layered circle dies just made it pop. I discovered that the arched stems with leaves from the Foxy Friends stamp set aren't quite round enough to fit on the largest circle from the Layering Circles Framelits. So I cut the circle first and then laid the stamp on the circle. The nice thing about photopolymer stamps is that they are flexible, which means I was able to bend the stamp to make the garland fit my circle. Then I laid my acrylic block on top of the stamp so it would stay in just the right position. And no need to worry about lining up the ends of the garlands perfectly be attaching the