Posts

Showing posts from May, 2016

Four-Inch-Square

Image
I found this new technique that is so simple yet makes for such a charming card. Simply cut a 4-inch square from Designer Series Paper and then cut it in half. For this card I cut two equal triangles by cutting from one corner to the next, but you could also cut at any angle or even straight across. By placing the triangles on a Whisper White card front, I had enough space to stamp my greeting in the middle and then decorate with some Botanical Blooms. I used coordinating Candy Dots and one Candy Dot base for flower centers, all retiring (although Candy Dots are coming back in a new form with a new name—Enamel Shapes). Products Used: Cottage Greetings stamp set (12), W 138940, $26.00; C 139962, $19.00 Botanical Builder Framelits Dies (14), 140625, $33.00 Whisper White 8½" x 11" cardstock (40), 100730, $8.50 until May 31; $9.00 June 1 Night of Navy 8½" x 11" cardstock (24), 100867, $7.00 until May 31; $8.00 June 1 Mint Macaron 8½"x 11" cardstock (2

Super Simple

Image
For my class this month, we made this super easy pouch, perfect for candy, tea bags, party favors, pad of Post-its, etc. Just a whole 6" x 6" sheet of paper from a designer series pack folded in half diagonally, then with corners brought in as in a diaper (remember those - they took diaper pins and were washed after use), with a flap folded down over that. Only adhesive is on the embellishment. No stamping. So quick and easy that my 6-year-old granddaughter has been making them from every sheet of paper she picks up. I don't think my daughter is thrilled with the abundance of paper pouches! The ones we made at class used sheets from the Pretty Petals Designer Series Paper Stack. I used the Fun Flower punch, which is retiring, and a leftover embellishment for the flower to decorate the front of the card. So many options for these pouches. The one I made this morning is for a gift of loose tea. I have a tea-loving friend with whom I share some of my specialty teas, maki

In Black and White

Image
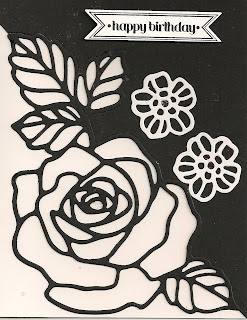
I love the vivid contrast of black and white that add such class to cards. These cards are so simple if you have the Rose Garden Thinlits Dies from Stampin' Up! All you have to do is cut a piece of Basic Black cardstock to 4" x 5¼", place the die diagonally on top and run it through the Big Shot. Adhere one of the "scrap" pieces and then line up the die-cut rose along the cut edges. I used Thick Whisper White cardstock to support the Basic Black pieces. Products Used: Rose Wonder photopolymer stamp set (14), 140697, $27.00 Basic Black 8½" x 11" cardstock (24), 121045, $7.00 Whisper White 8½" x 11" Thick Cardstock (24), 140272, $7.00 Archival Basic Black Stampin' Pad, 140931, $7.00 Rose Garden Thinlits Dies 95), 140619, $31.00 Bitty Banners Framelits (3), 129267, $15.00 (retiring)

Glittery and Teariffic!

Image
I had received a glittery Christmas card and wasn't sure how the to accomplish the effect. Once I discovered the technique, I just had to design a card for one of my classes. I struggled to select a stamp set but decided to use my favorite, A Nice Cuppa, which is retiring this month. In fact, the coordinating framelits are already sold out, which is a real bummer since one of my customers really wanted them. After stamping my images on a piece of Whisper White Thick card stock, I used my VersaMark ink pad to stamp the paper itself, making sure I inked the entire surface. Then I covered it with Heat & Stick Powder, melted it with the Heat Tool, sprinkled it liberally with Dazzling Diamonds glitter and heated it again. So cool! Although I'm not sure the words on the cup show up that well. On another card just like this I stamped a heart on the cup and added the words in the bottom right corner. I'll have to experiment with this technique and other types of stamps.