Posts

Showing posts from March, 2010

Basket of Tulips

Image
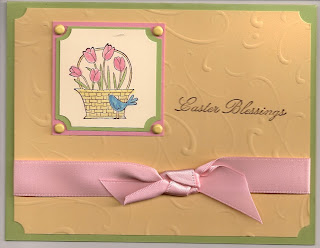
One more Easter card! Just couldn't resist. However, this could be a spring birthday card or all occasion card simply by changing the wish. The Barely Banana cardstock was embossed with the Stampin' Up Perfect Details Texturz Plate (115962, $3/95) on the Big Shot Die-Cut Machine (113439, $99.95), then wrapped with Pretty in Pink 5/8" Satin Ribbon knotted and trimmed to look like a bow. I wasn't sure if the embossing would interfere with the stamping, but "Easter Blessings" stamped easily (from Abundan Hope stamp set, Occasions Mini Catalog, 117054, $17.95 for wood mount stamps or 118547, $13.95, for the clear mount stamps). I stamped the basket of tulips (A Flower for All Seasons stamp set, 111592, $14.95) with Chocolate Chip ink and used Certainly Celery, Pretty in Pink, Barely Banana and Bliss Blue Stampin' Write markers. The Ticket Corner punch (107214, $6.95) on the corners and Barely Banan brads (Soft Subtles, 106954, $8.95) finished it off. Th

April 2010 Card Kit of the Month

Image
This kit uses one of my very favorite stamp sets!

Easter Basket

Image
I tried to make an Easter basket card for my grandsons using the Perfect Details Texturz Plates (115962, $3.95) and Top Note Bigz Die (113463, $2195) for the Big Shot (113439, $99.95) on Kraft card stock. The handle didn't turn out as well as I had anticipated; it's twill tape (105245, $5.95) covered with snail adhesive pressed on the Not Quite Navy card. I used my wide oval punch to cut "eggs" from the Bella Bleu designer series paper (113974, $9.95). The chocolate bunny (116980, $7.95, Occasions Mini Catalog) looks like real chocolate! I stamped him in Chocolate Chip craft ink on Chocolate Chip card stock and embossed with clear embossing powder. Then I cut him out to add to the basket.

Easter Blessings

Image
I love this set (Abundant Hope) from the Occasions Mini Catalog. It is so springy! And I can use it for lots more than just Easter! Notice I stamped the daffodils all over the Certainly Celery card with matching ink, but I colored the stamp with my Certainly Celery and So Saffron markers before stamping on the piece of Whisper White card stock. Although the So Saffron ribbon is leftover from a previous mini catalog, you could substitute Basic Gray satin ribbon (117666), Certainly Celery satin ribbon (117288), or Certainly Celery 5/8" grosgrain ribbon (109050). The Abundant Hope stamp set is available for either wood mount (117054, $17.95) or clear mount (118547, $13.95). You do need to purchase the Clear-Mount Blocks, however, for the clear mount stamps. However, you would use those blocks over and over again with any clear mount stamp sets you purchase now or in the future.

Vintage Birthday Wishes

Image
I'm still using up that gorgeous designer paper! I cut my Certainly Celery cardstock 6"x6" and folded it in half using the bone folder for a firm crease. And I'm still using the Vintage Vogue stamp set. I love that set and it coordinates so well with this designer paper. Pale Plum, Perfect Plum and Certainly Celery inks, Circle Ice brads, Certainly Celery ribbon tie it all together. We even have high quality envelopes to fit this size card (Small Open-End Envelopes, 107286, $7.50 for 20).

Borrowed Template

Image
Aly Schilling made the above card. Such a simple card yet so appealing! I decided to copy her layout for my card, below. Actually, I have gotten into my unused designer paper. For some reason, I was hoarding all the pretty sheets instead of using it. I love this paper in it's hues of Perfect Plum and Pale Plum on Very Vanilla. I fear the paper I used is retired, as is the Certainly Celery ribbon, although the new satin ribbon is softer and would work just as well, if not better. My stamps are from the Vintage Vogue and Teeny Tiny Wishes stamp sets. I really enjoyed using the Circle of Ice brads on some of my cards. So grab some designer paper you have on hand, match it with solid card stocks and find a stamp set that fits, add some ribbon and brads and you can give this design a fresh look!

So Elegant!

Image
The techniques used in this card were taught to us by Jen Rios-Raner at our March Heartfelt Stampers meeting (that's the name of our team of demonstrators). Using the Big Shot, she made a stencil with the Tulipe Bigz Die. After placing it on our Very Vanilla cardstock, we filled it in with Pretty in Pink classic ink and a sponge dauber. Before removing the stencil, we daubed some Close to Cocoa ink in various places and then ran the Very Vintage jumbo wheel inked with Close to Cocoa over that. It didn't fill in everywhere, but that's what provided the unique texture to the design. The round notch for the ribbon was cut with the 3/4" circle punch. To form the Close to Cocoa ring edging the notch, you need to use the same punch on a piece of the cardstock, then center that hole in the larger hole of the 1" circle punch. Attach to the cardstock around the notch and trim excess. The epoxy brad and Scallop Trim along with the satin ribbon add to the elegance of

Simply from Scraps

Image
This card was made solely from scraps of cardstock and designer paper I had accumulated. Even the Sage Shadow Card had been cut before but never used. I found the Top Note in Chocolate Chip in my bag of Earth Elements scraps and it pulled the card together. I ran a Close to Cocoa scrap through the Big Shot with the Swirls Scribbles Sizzlits Die and then stuck a scrap of Sage Shadow in the Cherry Blossom Embosslits Die folder and ran it through the Big Shot. A corner rounder punch on the scrap of Very Vanilla cardstock as well as the bottom corners of the card itself softened the lines of this card. Even the "happy birthday" was stamped (Teeny Tiny Wishes stamp set) on scrap cardstock and then punched out with the Word Window punch. A couple gold brads and Sage Shadow 1/4" grosgrain ribbon finished it off.

Elegant Variation

Image
What a difference the paper makes! If you compare this card to the one Aly made me (previous post), you will see the contrast in moods. I used the Groom Specialty Paper (116478, $13.95 for 10 textured 12"x12" sheets, 5 of each design) with Whisper White cardstock (100730, $7.50 for 40 sheets) and 5/8" White Satin ribbon (114616, $8.95 for 15 yards). "Sharing in your Sorrow" is from the Thoughts & Prayers stamp set (113252, $25.905). As you can see, I also used the scallop edge punch (112091, $15.95) and the scallop oval punch (114889, $15.95). I lined the inside of the card with Whisper White cardstock to make it easier to read the verse and leave room to add a personal note. Stampin' Dimensionals (104430) lifted the mid section from the basic card. Since the card was so simple to make, I whipped up a batch, making some birthday cards instead of sympathy cards.

Simple But Impressive

Image
I actually made the top ten in February sales for our team and received this card from my upline. Aly merely stamped stars (Starring You stamp set--111696, $13.95) in Pumpkin Pie ink (105216, $5.959) on Pumpkin Pie cardstock (105117, $5.50 for 24 sheets). Then she used the scallop edge punch (112019, 15.95) on Whisper White cardstock (100730, $7.50 for 40 sheets) to trim the edges of her textured Pumpkin Pie cardstock. She wrapped that in 1-1/4" Striped Grosgrain Ribbon (Pumpkin Pie, 115616, $8.95 for 10 yards). "Way to Go" (Starring You stamp set) is punched with the Wide Oval punch (112082, $15.95) and tied onto the knotted ribbon with thread. The embellished textured cardstock pops out because of the Stampin' Dimensionals (104430, $3.95) behind it.

Swing Card

Image
This is the swing card I designed for a project for my demonstrator team to make at our monthly meeting. Above is how it looks when standing up. When folded to place in an envelope, it looks like this: When the recipient opens the card, the center section swings around so she can read the "inside": When I flatten the card so you can see the front without its folds, it looks like this: To make this card, you begin with a piece of 5-1/2"x6-3/4" Pretty in Pink cardstock (100459, $5.50 for 24 sheets). I decorated the top and bottom edges of both sides using Cupcakes wheel (113121, $6.50--a Stampin' Around Handle is needed, 102971, $3.95). Next, you'll make a 1-1/4" score line 2-3/4 inches from each side, at the top and the bottom of the card. From each score line, cut a slit 1-3/8" long. Then connect those slits with another slit (this cut on each side should be 3 inches long). The best way to do this is to use the Paper Cutter (104152, $24.95) wi

March 2010 Card Kit of the Month

Image