Posts

Showing posts from December, 2011

Christmas Gift Tags Class

Image
Yesterday was my Christmas Gift Tags class. In addition to the gift tags, we made this cute little candy purse as well as some tile coasters. We used Frostwood Lodge Designer Series Paper and Garden Green Card Stock with the Top Note Die to make the purse, attaching a small cello bag of mints inside it. We also used the Cherry Cobbler Dazzling Details (Occasions Mini Catalog) on the image from the Oval All stamp set. Frostwood Lodge Designer Series Paper and Garden Green Card Stock Two of these three gift tags were cut with the Two Tags Bigz die. Using Mini Glue Dots to adhere the rosette (Frostwood Lodge Designer Series Paper, Holiday Mini Catalog) on the Pink Pirouette and Cherry Cobbler tag made assembly so much easier that the glue and hot glue gun we used for our Fall wreath! The Petals-a-Plenty Textured Embossing Folder added the special effect I wanted for the middle of the card (covering the crease). I love the way our punches coordinate with our stamp images! They make details

Check it Out!

Image
Just log on to my demonstrator business web site (teadrinkingstamper.stampinup.net) to take advantage of the great savings being offered by Stampin' Up!

Mostly White Christmas Cards

Image
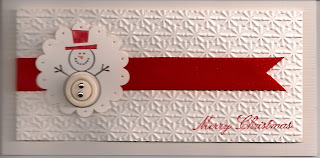
Textured embossing on textured card stock with a splash of color in two different designs. I colored the snowman stamp with markers before stamping and then punching. He is from the Button Buddies stamp set and I even used the button for his belly, although he's cute without it, too. The Merry Christmas greeting had to be stamped inserting in the textured embossing folder and running it through the Big Shot. The ornaments were cut with the Stocking Accents die in the Holiday Mini Catalog. After cutting them, I laid the Old Olive card stock strips on the die where I wanted them to lay on the ornaments and then ran them through the Big Shot. However, I just attached and then trimmed the brushed silver card stock. A couple rhinestones for some bling and ribbon to "hang" the ornaments provided the effect I wanted. Products Used: Button Buddies stamp set (8 stamps), W 122735, $29.95; C 122737, $21.95 Teeny Tiny Wishes stamp set (24 stamps), Wood Mount only, 115370, $36.95 12&q

Hobby Horse from Stocking Builder Punch

Image
This card includes items from two of our mini catalogs, the Holiday Mini, which expires January 3rd, and the Occasions Mini Catalog, which begins January 4th. So if you want the Stocking Builder Punch or the frostwood Lodge Designer Series Paper, you have only a couple more weeks to order them. (Ugh! How can this year be coming to a close so quickly?) And I haven't used a single stamp to make this card! I've already pre-ordered a number of items from the Occasions Mini Catalog—actually, most of the contents of the catalog. Oh, my poor wallet! This card features the Adorning Accents Textured Impressions Embossing Folders and the Adorning Accents Edgelits Die. Just wait until you see them and how easy they are to use, how easy they are to line up with each other. There's even a stamp set that will stamp dots inside the embosed edge, but I didn't choose to use that on this card. Notice how nicely the Stocking Builder Punch converts to a hobby horse! Just turn it upside dow

Vintage Stocking Christmas Card

Image
Our Heartfelt Stampers team time always includes a simple card to make. Kriss Huels taught us this lovely card using the Stitched Stockings stamp set (Holiday Mini Catalog), Borderlines stamp set (2011-12 IDB&C), and Beautiful Season stamp set (2011-12 IDB&C). I love the way the colors (Crumb Cake, Always Artichoke and Very Vanilla) and the sponging come together to give the vintage look to this card. By the way, the stamp that includes the stocking cuff, heel and toe is laid out just right for punching them all at once with the Stocking Builder Punch. Products Used: Stitched Stockings stamp set W 123782, $27.95; C 123784, $19.95 Beautiful Season stamp set, W 122680, $21.95; C 122682, $16.95 Borderlines stamp set, W 122640, $22.95, C 122642, $16.95 Crumb Cake 8.5" x 11" card stock (24 sheets), 120953, $6.95 Very Vanilla 8.5" x 11" card stock (40 sheets), 101650, $8.50 Crumb Cake Classic Stampin' Pad, 121030, $5.95 Always Artichoke Classic Stampin' Pa

Christmas Postcard

Image
Here is one more Christmas card from my Christmas card class. Just one stamp, Christmas Postcard, stamped with StazOn Jet Black ink (StazOn ink doesn't bleed when adding other colors) and colored with Stampin' Write Markers. The card is textured Cherry Cobbler card stock with Very Vanilla Top Note trimmed off at top. The Crochet Trim adds that extra touch that finishes off the card. Products Used: Christmas Postcard Stamp (À la Carte stamps), 121428, $9.95 Cherry Cobbler 12" x 12" Textured Card Stock, Regals Collection (20 sheets), 121076, $11.95 Very Vanilla Card Stock (40 sheets, 8½" x 11") 101650, $8.50 StazOn Jet Black Ink Pad, 101406, $7.95 Cherry Cobbler Stampin' Write Marker, 119681, $3.50 Not Quite Navy Stampin' Write Marker, 100059, $3.50 More Mustard Stampin' Write Marker, 100076, $3.50 Always Artichoke Stampin' Write Marker, 105113, $3.50 Pretty in Pink Stampin' Write Marker, 100045, $3.50 Chantilly Crochet Trim, 5 yards, 11

Rosette Ornament

Image
Tonight is the Heartfelt Stampers (my team of Stampin' Up! demonstrators) Christmas party. We will eat well, make a card and a 3-D item plus have a handmade ornament exchange. Of course, the rule is that we must use only Stampin' Up! products (unless it's something we cannot purchase through our company, such as glass ornaments). My ornament uses our Red Glimmer paper, specialty designer series paper, card stock, our buttons and our basic pearls. The strips of paper were cut in graduating sizes, beginning with 1¼ by 12 inches, then I narrowed them by ¼ inch. These strips were then scored at ¼-inch intervals. I discovered that the card stock, being thicker than the dsp needed to be cut somewhat shorter and I removed a 2-inch piece (probably could have removed even more). I think that by the time I reached only ½-inch wide, I should have shortened that length as well to make the final rosette rounder. Of course, for each rosette I made, I used two long strips glued together