Using Both Sides of Your DSP
I think this sheet of designer series paper from the Share What You Love specialty pack is my favorite. But then I look at another piece and I change my mind. They are all gorgeous. Both sides! There's usually at least one side that I'm not as fond of as the others, but in this case I would be hard pressed to pick a side I don't care for.
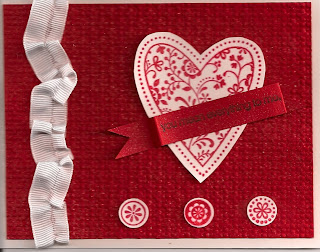
What you can't see in this picture is the shiny, pearlized finish. The doily is also pearlized. And this designer series paper is as heavy as card stock! I've paired this with the returning Mint Macaron card stock for the card base and the greeting. I'm still using the Stitched Shapes Framelits that were, to my dismay, discontinued. But you can use a circle punch or one of the Layering Circles Framelits. They have been so popular, I'm surprised they are no longer available.
One of the nice things about this particular sheet is how both sides look good together. Consequently, when I cut my dsp 4" x 5-1/4" for the card front, I then cut off 1-3/4" and flipped it over. The velvet ribbon was attached to the bottom of the floral piece and then both pieces were mounted on the card front with Stampin' Dimensionals.
 Products Used:
Love What You Do photopolymer stamp set (13), 148042, $21.00
Share What You Love 12" x 12" Specialty Designer Series Paper (24), 146926, $27.00
Mint Macaron 8-1/2" x 11" card stock (24), 138337, $8.50
Grapefruit Grove 8-1/2" x 11" card stock (24), 146972, $8.50
Rich Razzlebery 1/4" Velvet Ribbon (10 yards), 147016, $8.00
Pearlized Doilies (24), 146936, $4.50
Duet Banner Punch, 141483, $1.00
What you can't see in this picture is the shiny, pearlized finish. The doily is also pearlized. And this designer series paper is as heavy as card stock! I've paired this with the returning Mint Macaron card stock for the card base and the greeting. I'm still using the Stitched Shapes Framelits that were, to my dismay, discontinued. But you can use a circle punch or one of the Layering Circles Framelits. They have been so popular, I'm surprised they are no longer available.
One of the nice things about this particular sheet is how both sides look good together. Consequently, when I cut my dsp 4" x 5-1/4" for the card front, I then cut off 1-3/4" and flipped it over. The velvet ribbon was attached to the bottom of the floral piece and then both pieces were mounted on the card front with Stampin' Dimensionals.

Love What You Do photopolymer stamp set (13), 148042, $21.00
Share What You Love 12" x 12" Specialty Designer Series Paper (24), 146926, $27.00
Mint Macaron 8-1/2" x 11" card stock (24), 138337, $8.50
Grapefruit Grove 8-1/2" x 11" card stock (24), 146972, $8.50
Rich Razzlebery 1/4" Velvet Ribbon (10 yards), 147016, $8.00
Pearlized Doilies (24), 146936, $4.50
Duet Banner Punch, 141483, $1.00


Comments