Posts

Showing posts from June, 2018

Flowery Thank You

Image
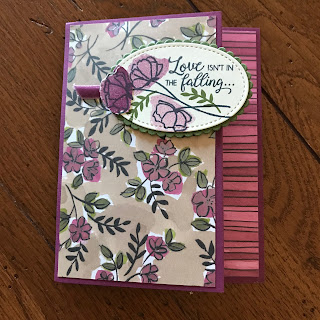
I was able to use this designed paper so that both side could be seen, much as I did in a previous post with another sheet. It was my first attempt and I didn't think I was that fond of this card but it has grown on me, especially since one of my customers raved about it. This card also utilizes the Share What You Love Suite. I did use half an old doily behind the oval focal point and added one of the colored pearls from the Share What You Love Suite. Products Used: Love What You Do photopolymer stamp set (13), 148042, $21.00 Rich Razzleberry 8-1/2" x 11" card stock (24), 115316, $8.50 Whisper White 8-1/2" x 11" card stock (40), 100730, $9.00 Basic Black 8-1/2" x 11" card stock (24), 121045, $8.50 Rich Razzleberry Classic Stampin' Pad, 147091, $7.50 Tuxedo Black Memento Pad, 132708, $6.00 Share What You Love Artisan Pearls (100), 146927, $6.00 Banner Triple Punch, 138292, $23.00 Layering Ovals Framelits (15), 141706, $35.00

Pretty in Powder Pink

Image
Items from the Share What You Love Suite certainly don't need to be limited to the products contained in the suite. Here I have used the Lovely Floral embossing folder with retired designer paper and embellishment. Just love the soft look and I think that paper coordinates beautifully with the flower in the folder. Once again I added some Whisper White craft ink to the raised portion of the embossed flower, which I embossed on the top portion of the card. I had those adorable felt bows left over, along with some powder pink ribbon, and just had to add one to the front.  No greeting as yet, so this can either be a note card or I can add a greeting later. Products Used: Lovely Floral Dynamic Textured Impressions Embossing Folder, 148048, $9.00 Powder Pink 8-1/2" x 11" card stock (24), 144244, $8.50 Craft Stampin' Pad (uninked) & Refill, 147277, $9.50 Fresh Florals Designer Series Paper Stack, retired (2017-18 Annual Catalog) 2017-2019 In Color Bitty Bows

Cut it Out

Image
Embossing folders can be used in so many ways. For this card, I sponged on white craft ink and then cut around the raised image, not something I do very often. A strip of dsp on the side and one of the new Pearlized Doilies made this a simple card to put together. As you can see from the shadows around the floral design, I mounted it to the card front with Stampin' Dimensionals. Products Used: Share What You Love 12" x 12" Specialty Designer Series Paper (24), 146926, $27.00 Mint Macaron 8-1/2" x 11" card stock (24), 138337, $8.50 Uninked Craft Stampin' Pad & Refill (White), 147277, $9.50 Lovely Floral Dynamic Textured Impressions Embossing Folder, 148048, $9.00 Pearlized Doilies (24), 146936, $4.50 Stampin' Dimensionals (300), 104430, $4.00 Mini Stampin' Dimensionals (720), 144108, $4.00

Barbecue, Anyone?

Image
Masculine cards are not the easiest to come up with, and yet they are frequently needed. Now I know Father's Day is past, but we made this card at my May class. I was thinking of Father's Day when I designed it but my father has long been deceased. So I simply made it a masculine card and allowed the one class attendee who still has a father to add the word "Dad" on the apron pocket but used an enamel shaped heart (leftover) to fill in the gap.  I did add a banner saying "Happy Father's Day" and wrote a note inside for my husband. I have to admit that my customers were very sad to use this side of the Share What You Love specialty designer series paper since the other side was so very pretty. But this side is so great for masculine cards. Plus I was trying to introduce some of the new colors and chose to use the Shaded Spruce to make the design pop. The apron is from the Apron of Love stamp set, but the Apron Builder Framelits make it so easy to make

More Share What You Love

Image
I just went to town with the Share What You Love Suite from Stampin' Up!  So many ideas. Such gorgeous designer paper. For this card, I actually cut out a flower to attach to the focal point, but didn't use the whole flower. Instead, I lined it up with one that matched sufficiently because I was cutting from a scrap of paper instead of cutting into a bigger piece. But I think it turned out great. The Share What You Love dsp is worth the extra price you pay for it because you get twice as many sheets as the normal packs, the paper is the weight of card stock, it is hand-painted and it has a translucent, pearlized finish.  This card was actually one of the samples I made for my May class, not one we made. I used some old Mossy Meadow ribbon I had left from its In Color days and a piece of Mossy Meadow behind the dsp.  Did you know that you can cut your shape, in this case the scalloped circle from the layering circle dies, from the middle of you paper layer? No one will ever

A Favorite With the Share What You Love Suite

Image
I think the Share What You Love Specialty Designer Paper is my favorite of all time! It is so rich and the pieces work so well together. This card, with its special fold and use of three different designs, is one of my favorites so far. One of the things I have learned in making cards is that the final measurement is what counts. When the card is folded, it should measure 4-1/4" x 5-1/2" for a standard card that fits our medium envelopes. Play around with folds and you can do almost anything, although this is one of the more common folds. My card base was one sheet cut lengthwise at 5-1/2", resulting in a piece that was  5-1/2" x 11". Because I knew the resulting card size, I scored it at 4-1/4".  The remaining segment can simply be folded in half, but the scoring would be at 3-3/8". Two pieces of dsp were cut to 3-3/8" x 5-1/4" and the final piece was 1" x 5-1'4".  The Very Vanilla insert was 3" x 5-1/4" I used t

Using Both Sides Again

Image
I CASEd this card after seeing a video on how to use both sides of the Designer Series Paper, especially that of "Share What You Love" specialty dsp.  You won't see the reverse until you open the card. So I cut my card base at 5-1/4" x 5-1/2". Scoring at 4-1/4" gave me the standard size card. I then added a strip of Basic Black under the inch-wide portion of the card base before attaching a 4" x 5-1/2" piece of designer paper. When the card is opened, you see the reverse design. And remember, this particular paper has an extra special touch—a translucent, pearlized finish. Because I wanted to send an appreciation card to my "shepherd" at Community Bible Study, I added the letter I ("Make a Difference" stamp set) to the saying from the "Love What You Do" stamp set. The flowers on this card are also from the "Make a Difference" set. I was surprised when I discovered the "Stitched Shapes" framelit

Big Plans Planner Kit

Image
Are you curious about Stampin'  Up!'s planner kit? Do you wonder how it goes together and if it will be just right for you? Check out this video. I think it will answer all your questions.

Using Both Sides of Your DSP

Image
I think this sheet of designer series paper from the Share What You Love specialty pack is my favorite. But then I look at another piece and I change my mind. They are all gorgeous. Both sides! There's usually at least one side that I'm not as fond of as the others, but in this case I would be hard pressed to pick a side I don't care for. What you can't see in this picture is the shiny, pearlized finish. The doily is also pearlized.  And this designer series paper is as heavy as card stock! I've paired this with the returning Mint Macaron card stock for the card base and the greeting. I'm still using the Stitched Shapes Framelits that were, to my dismay, discontinued. But you can use a circle punch or one of the Layering Circles Framelits. They have been so popular, I'm surprised they are no longer available. One of the nice things about this particular sheet is how both sides look good together. Consequently, when I cut my dsp 4" x 5-1/4" for